Adventures in Modding a Surefire U2 - Confirm Version?

sween1911

Flashlight Enthusiast
Joined
Dec 10, 2003
Messages
2,057
Location
Pennsylvania
Just for my own sanity...

Assuming I get the plastic spacer tube out and make clearance for an 18650, even though this is a 6V light that requires a 6V LED, will the circuit power an XHP50 even with an 18650?
 

turbodog

Flashaholic
Joined
Jun 23, 2003
Messages
6,425
Location
central time
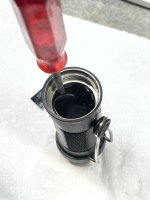
The socket extension I used was just smaller than the ID of the tube, provided good leverage, and applied concentrated rotating/shearing force... you could hear the glue cracking immediately.
 
Joined
Sep 16, 2020
Messages
971
Just for my own sanity...

Assuming I get the plastic spacer tube out and make clearance for an 18650, even though this is a 6V light that requires a 6V LED, will the circuit power an XHP50 even with an 18650?

It should work as it has a boost driver(?). I run a single 16650 in my stock Luxeon V U2 just fine.
 

desert.snake

Flashlight Enthusiast
Joined
May 8, 2017
Messages
2,065
Location
Eastern Europe
Just for my own sanity...

Assuming I get the plastic spacer tube out and make clearance for an 18650, even though this is a 6V light that requires a 6V LED, will the circuit power an XHP50 even with an 18650?
Everything will work great. I also see on sale XHP50.2 95 CRI and XHP50.3 HI for a thinner beam. They are already on sale and they have a great shade, although some of my friends prefer SST-40

1667408578965.png
1667408588293.png
1667408607697.png
 

sween1911

Flashlight Enthusiast
Joined
Dec 10, 2003
Messages
2,057
Location
Pennsylvania
Open item with LED selection:

The plastic base under the LED die doesn't look like a good heat-sink to stick an XHP50.2 down. It's got that little pedestal where the SSC is nestled. Wondering if anyone has taken steps to remove the plastic base/disk and if there's a substantial heat sink surface under there. The black plastic base wiggles around, but I'm concerned that I might break it if I tug on it. If that base needs to stay in place, I'll be grinding it off and I guess gluing the MCPCB down where I'd normally use arctic silver.

I usually default to 16mm MCPCB as they fit perfectly in P60 heads, but I'm thinking I'd go with the 26mm MCPCB or as big as I can to get some heatsinky real estate. Maybe a metal ring or something around the edge of the board to contact the head and bleed that heat off. Hmmmm. I'm fully expecting to have to Dremel out a channel in the MCPCB to run the lead to the LED's +/- terminals.
 
Last edited:

Nitroz

Flashlight Enthusiast
Joined
Jul 29, 2004
Messages
3,258
Location
Monroe
What's up people! Long time no see. Life has been extremely busy and my work schedule has changed and I only have 2 days off versus the 3 I had in the past. Enough of that!

That is definitely a Lux V emitter and the sleeve can be pulled out and can run an 18650. I have replaced many Lux V emitters with XPH.50.2 emitters and the upgrade is awesome. I think I remember machining the heat sink so that the reflector would sit flush.

@sween1911 Good work opening up the U2! Those things are tricky and you never know how much heat one will take. I have had one or two that bubbled the reflector finish.
 

sween1911

Flashlight Enthusiast
Joined
Dec 10, 2003
Messages
2,057
Location
Pennsylvania
What's up people! Long time no see. Life has been extremely busy and my work schedule has changed and I only have 2 days off versus the 3 I had in the past. Enough of that!

That is definitely a Lux V emitter and the sleeve can be pulled out and can run an 18650. I have replaced many Lux V emitters with XPH.50.2 emitters and the upgrade is awesome. I think I remember machining the heat sink so that the reflector would sit flush.

@sween1911 Good work opening up the U2! Those things are tricky and you never know how much heat one will take. I have had one or two that bubbled the reflector finish.

THE MAN! Thanks for checking in @Nitroz ! Hey since you're here, how do you plop the XHP50.2 down on that plastic LED base? Grind off the little plastic wings? Remove that whole plastic base? Any heat management concerns there?
 

Nitroz

Flashlight Enthusiast
Joined
Jul 29, 2004
Messages
3,258
Location
Monroe
THE MAN! Thanks for checking in @Nitroz ! Hey since you're here, how do you plop the XHP50.2 down on that plastic LED base? Grind off the little plastic wings? Remove that whole plastic base? Any heat management concerns there?
Plastic LED base?
 

sween1911

Flashlight Enthusiast
Joined
Dec 10, 2003
Messages
2,057
Location
Pennsylvania
Plastic LED base?
Ok lemme back up, maybe I'm wrong. The black surface that the stock LED is on, is that aluminum? It appears to be loose on the one I'm working on, it wiggles around. I thought it was plastic.

The stock LED is sitting in a little elevated base, once I unsolder and remove it, I assume I'll have to dremel that little base off and flatten that spot to place the XHP50.2. Have you done that?
 

desert.snake

Flashlight Enthusiast
Joined
May 8, 2017
Messages
2,065
Location
Eastern Europe
Just talked to a friend. It appears to be an even older version. It's not a plastic shield, it's aluminum and it was fixed with a press, but it's not good if it wobbles.

Those 4 points on the sides are press marks so that the aluminum shield does not wobble.

1668065287653.png


You can remove these traces of the press with a small drill to remove the insides completely, then it will be easier to grind off the protruding aluminum sides that hold the LED and then put everything back and fix

A friend of mine was replacing an LED with an XML2 in 2013. He had a newer version and this aluminum shield was attached with 2 screws and smeared with thermal paste

1668063140793.png
1668063191222.png


1668063238067.png


1668063335226.png

1668063359702.png
 
Last edited:

desert.snake

Flashlight Enthusiast
Joined
May 8, 2017
Messages
2,065
Location
Eastern Europe
After replacing the diode, it is also necessary to cut out a ring of insulating material so that the reflector does not short-circuit the leads of the LED (it's unlikely, but it's better to be safe). I don't remember what he used, some thin plastic, maybe Kapton tape.

He also wrote that the LED board should be 15 mm in diameter or less, if I understood him correctly, this is due to the shape of the back of the reflector
1668089834353.png
 

sween1911

Flashlight Enthusiast
Joined
Dec 10, 2003
Messages
2,057
Location
Pennsylvania
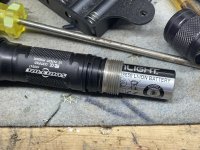
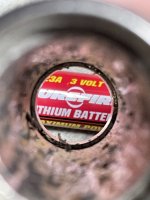
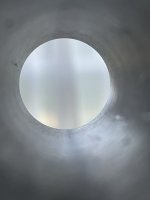
Ok, we got the plastic sleeve out, the stepped section removed (turned out to be a press-fit brass ring that disintegrated when I bored it out) and the inside sanded to remove scratches.

Running with the original LED like a champ on an 18650!

Next step... getting the LED swapped for the XHP50.2 that just came in.
 

Attachments

  • DEAAF9BA-064B-4494-A42B-F64FDAE1E725.jpeg
    DEAAF9BA-064B-4494-A42B-F64FDAE1E725.jpeg
    177.7 KB · Views: 111
  • 096134FE-6C34-422A-8770-57987E27692F.jpeg
    096134FE-6C34-422A-8770-57987E27692F.jpeg
    135.3 KB · Views: 118
  • E2B782D8-688F-4DBF-AB78-3CE0B18CA18E.jpeg
    E2B782D8-688F-4DBF-AB78-3CE0B18CA18E.jpeg
    368.4 KB · Views: 123
  • 0D2D6593-A39B-4C2C-9A10-DBD7FE145E79.jpeg
    0D2D6593-A39B-4C2C-9A10-DBD7FE145E79.jpeg
    235.1 KB · Views: 122
  • 692BAA36-9D09-4E0C-9290-177E6E11E84B.jpeg
    692BAA36-9D09-4E0C-9290-177E6E11E84B.jpeg
    164.4 KB · Views: 117
Last edited:

sween1911

Flashlight Enthusiast
Joined
Dec 10, 2003
Messages
2,057
Location
Pennsylvania
SUCCESS!

Got the heatsink out and the original LED off of it...

W8raeioh.jpg


Once I unsoldered the original LED, I could coax the heatsink out and pull the wires out the back. Ground the little ears off and sanded the schmutz off the heatsink, opened up the holes just a tiny bit with a drill, apply LED (Arctic Silver on the back) run the leads through the holes, solder down, XHP50.2 on a 16mm MCPCB fits perfectly. Apply fiberglass tape over the solder joints, and a butterfly gasket centers the LED in the reflector pretty well. It came together pretty well.
 

sween1911

Flashlight Enthusiast
Joined
Dec 10, 2003
Messages
2,057
Location
Pennsylvania

ampdude

Flashlight Enthusiast
Joined
Apr 7, 2007
Messages
4,615
Location
USA
Wow! I need to try this mod, but I'm afraid I'll mess it up. One of these days maybe!

I wonder if I could cannibalize one of the LED's out of one of my junky Convoy lights.
 
Last edited:

sween1911

Flashlight Enthusiast
Joined
Dec 10, 2003
Messages
2,057
Location
Pennsylvania
Hey @ampdude if you need any info, lemme know.

Key points:

1) Determine which version you have if you want to put a 3V or 6V LED.

2) Getting the control ring off safely. I forget the exact procedure and don't want to misstate it here.
Removing the ring is essential because when you go to unscrew the bezel, you'll need to put a strap wrench on the part of the head where the ring is.

3) Unscrewing the head - Some heat, rubber strap wrenches, a vise, some prayers.

4) Once it's off, it's mostly a standard LED swap. The heatsink has two "ears" machined into it. Be careful and take your time and a Dremel or a file can take care of it. A butterfly gasket on the LED for centering in the reflector.
 
Last edited:
Top