
PhotonFanatic
Flashlight Enthusiast
I have a good collection of Stainless Steel Damascus round bar stock made by Chad Nichols and I also have a couple of custom orders for lights using that steel.
So I'm planning to make around four lights, possibly more, and send them all off to the heat treater at once, in order to save some money--otherwise the lot charge is a bit much for a single light.
So far I have two styles that I've completed; one is an RCR123 powered single-stage light and the other will be a three-level light powered by a rechargeable 18650 lithium-ion battery. Both versions are twist operation.
I am open to making one or two more custom lights, perhaps in slightly different styles, depending on what you might want. If interested, please contact me via e-mail, or PM.
Here are the two lights:
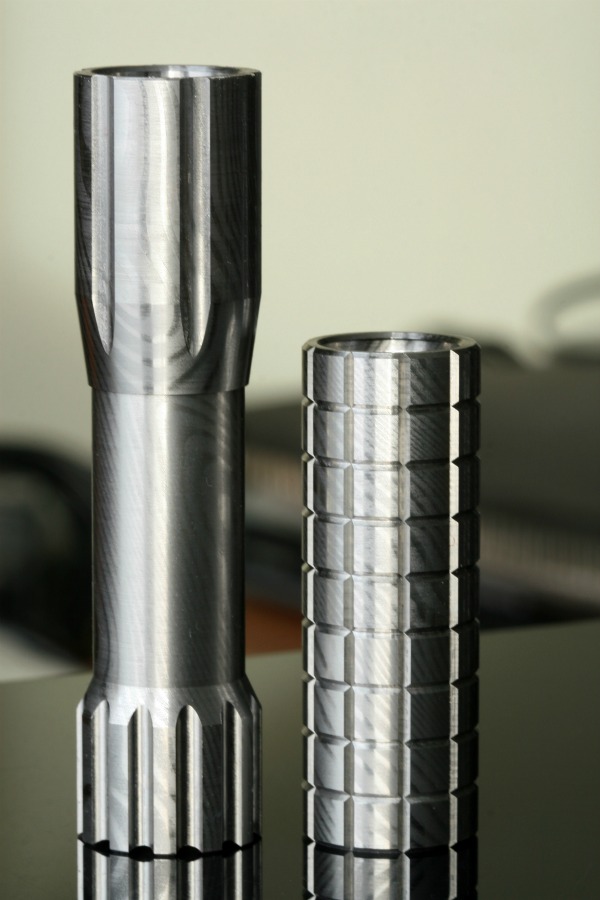
And some close-ups of the RCR123 light:


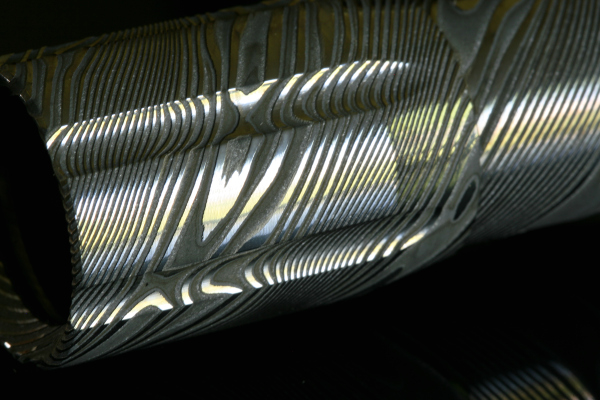
Admitedly, the SS Damascus doesn't really look that great until it is heat treated and etched and then it looks like this:
But, as a perpetual tinkerer, I'm keen to find a way to make SS Damascus, which is comprised of two steels, i.e., 304 and 303, have more contrast--shinier 303 and blacker 304 after they are etched and the light is finished.
So as part of my experiments, I've managed to etch the SS Damascus to achieve a nice sharp demarcation between the two steels:

Why so deep--well I intend to machine the high relief 303 steel after it has been heat treated, to take a skim coat off. That will leave me with a super smooth surface which can then be buffed and polished, resulting in something like this:


That test piece has been buffed and polished and using a sharpie, I have also darkened the 304 steel, although that is not how I hope to darken the 304 in the final pieces.
I'll post more WIP photos as this moves along.
UPDATE 11/14/11:
I've been working on another 18650 battery sized Stainless Steel Damascus light, almost identical to the first one, but this has 8 Tritium vial slots to be filled in later by its new owner. Here is a close-up of the actual machining of one of the slots--as you can see, the end mill cuts lots of nice small slivers--which just love to embed themselves in my skin.

And here's a close-up of the slot after it has been cleaned up a bit:

And after all the flutes and Trit slots were in place, the tail end looks like this:

I think I might tame that down a bit and remove some of those sharp corners.
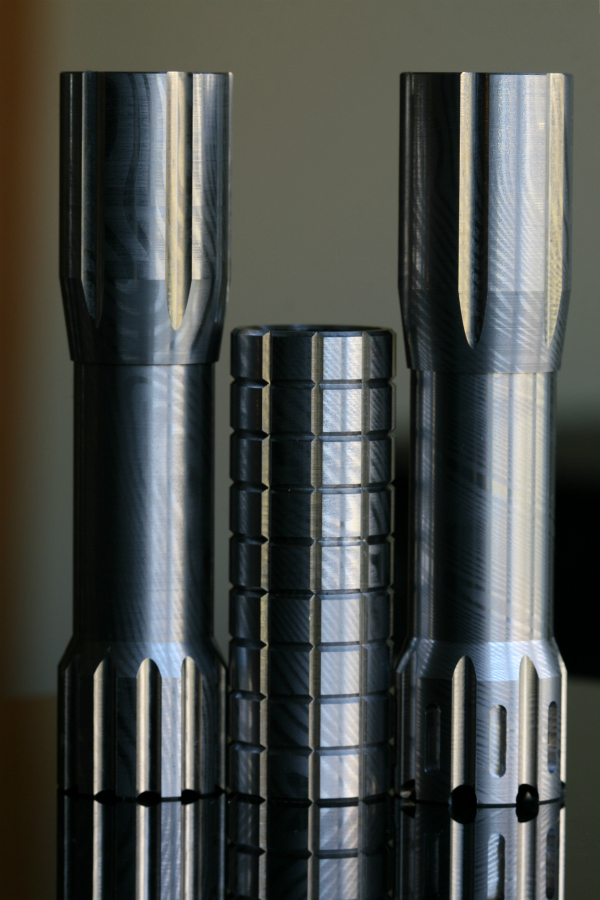
So, at this stage, I've completed machining three of these Chad Nichols' Damascus lights:
I am thinking of making one more CR123 version, the shorter one shown, plus I have an order for an 18350 battery sized version with an E-Series Light Engine compatible head. The customer wants a 'mule' style, i.e., no reflector, just pure flood output.
EDIT 12/7/11:
Wow, I can not believe it has been three weeks since I updated this thread.")
I have completed five of the stainless steel Damascus lights, with at least one more custom order to complete. Here are the five pieces:

Today I managed to etch three of the lights--remember this is being done before they are heat treated, something which is usually not done. Here's what the light looks like shortly after being rinsed in some water after being etched:

When you first etch a light and you see something like that, with its great contrast between the black and the silver, you think you've hit a home run. But the eurphoria quickly fades after you clean it up in some baking soda solution and let it dry. Then you get this:

Nice, but not what I want. I know though that etching with the right solution, after heat treating will produce a darker charcoal color.
Here are the RCR123 sized lights that were etched today--first a close-up:

And a bit further away:

I am really going to replicate the wet look, if at all possible, so I'm experimenting with my small test piece, although it has not been heat treated yet. Still, this is close to what I hope to achieve. And, no, this was not done with a Sharpie this time. Newly darkened piece on top, and below that is how it looked after the etching, but before darkening:

What's interesting about etching and finishing a stainless steel Damascus light is that I can do some things that a knife maker can not do, since the light will only be held in the hand and not be used to cut things, i.e., not subject to as much wear and tear. The test piece has been etched, then sanded and buffed, colored and then once again sanded. There will be one final step designed to protect the black areas from abnormal wear and tear.
EDIT 12-31-2011:
Just retrieved them at the heat-treater yesterday--spent part of today cleaning up the threads--they tend to get a little rough after heat-treating:

Will start building the LEs and working on the etching this week.
EDIT 1-8-2012:
As I have mentioned before, I've been experimenting with trying to darken the etch on stainless steel Damascus (pattern welded steel). That has led me to try various blackening agents and coatings. Alas, these do darken the etch, but I'm not 100% convinced that this is the final answer. But here are some of the results:
First is a light that was darkened using ink and then clear coated:


And the next light was coated with baking lacquer and then polished:


The final example was etched in the normal manner, although it needs a deeper etch so that I can polish the brighter colored steel a bit more, imo:


At the moment, I'm inclined to prefer the baked enamel version for a darker black, but I'm coming to realize that the normal etching, while not producing really dark black, more like gray or charcoal, has its advantages and beauty, too. The main advantage being that it is bare metal and will retain its look for a long, long time.
EDIT 01-13-2012:
Getting around to completing the etching, and in some cases, the re-etching of the lights:


So I'm planning to make around four lights, possibly more, and send them all off to the heat treater at once, in order to save some money--otherwise the lot charge is a bit much for a single light.
So far I have two styles that I've completed; one is an RCR123 powered single-stage light and the other will be a three-level light powered by a rechargeable 18650 lithium-ion battery. Both versions are twist operation.
I am open to making one or two more custom lights, perhaps in slightly different styles, depending on what you might want. If interested, please contact me via e-mail, or PM.
Here are the two lights:
And some close-ups of the RCR123 light:
Admitedly, the SS Damascus doesn't really look that great until it is heat treated and etched and then it looks like this:
But, as a perpetual tinkerer, I'm keen to find a way to make SS Damascus, which is comprised of two steels, i.e., 304 and 303, have more contrast--shinier 303 and blacker 304 after they are etched and the light is finished.
So as part of my experiments, I've managed to etch the SS Damascus to achieve a nice sharp demarcation between the two steels:
Why so deep--well I intend to machine the high relief 303 steel after it has been heat treated, to take a skim coat off. That will leave me with a super smooth surface which can then be buffed and polished, resulting in something like this:
That test piece has been buffed and polished and using a sharpie, I have also darkened the 304 steel, although that is not how I hope to darken the 304 in the final pieces.
I'll post more WIP photos as this moves along.
UPDATE 11/14/11:
I've been working on another 18650 battery sized Stainless Steel Damascus light, almost identical to the first one, but this has 8 Tritium vial slots to be filled in later by its new owner. Here is a close-up of the actual machining of one of the slots--as you can see, the end mill cuts lots of nice small slivers--which just love to embed themselves in my skin.
And here's a close-up of the slot after it has been cleaned up a bit:
And after all the flutes and Trit slots were in place, the tail end looks like this:
I think I might tame that down a bit and remove some of those sharp corners.
So, at this stage, I've completed machining three of these Chad Nichols' Damascus lights:
I am thinking of making one more CR123 version, the shorter one shown, plus I have an order for an 18350 battery sized version with an E-Series Light Engine compatible head. The customer wants a 'mule' style, i.e., no reflector, just pure flood output.
EDIT 12/7/11:
Wow, I can not believe it has been three weeks since I updated this thread.
I have completed five of the stainless steel Damascus lights, with at least one more custom order to complete. Here are the five pieces:
Today I managed to etch three of the lights--remember this is being done before they are heat treated, something which is usually not done. Here's what the light looks like shortly after being rinsed in some water after being etched:
When you first etch a light and you see something like that, with its great contrast between the black and the silver, you think you've hit a home run. But the eurphoria quickly fades after you clean it up in some baking soda solution and let it dry. Then you get this:
Nice, but not what I want. I know though that etching with the right solution, after heat treating will produce a darker charcoal color.
Here are the RCR123 sized lights that were etched today--first a close-up:
And a bit further away:
I am really going to replicate the wet look, if at all possible, so I'm experimenting with my small test piece, although it has not been heat treated yet. Still, this is close to what I hope to achieve. And, no, this was not done with a Sharpie this time. Newly darkened piece on top, and below that is how it looked after the etching, but before darkening:
What's interesting about etching and finishing a stainless steel Damascus light is that I can do some things that a knife maker can not do, since the light will only be held in the hand and not be used to cut things, i.e., not subject to as much wear and tear. The test piece has been etched, then sanded and buffed, colored and then once again sanded. There will be one final step designed to protect the black areas from abnormal wear and tear.
EDIT 12-31-2011:
Just retrieved them at the heat-treater yesterday--spent part of today cleaning up the threads--they tend to get a little rough after heat-treating:
Will start building the LEs and working on the etching this week.
EDIT 1-8-2012:
As I have mentioned before, I've been experimenting with trying to darken the etch on stainless steel Damascus (pattern welded steel). That has led me to try various blackening agents and coatings. Alas, these do darken the etch, but I'm not 100% convinced that this is the final answer. But here are some of the results:
First is a light that was darkened using ink and then clear coated:
And the next light was coated with baking lacquer and then polished:
The final example was etched in the normal manner, although it needs a deeper etch so that I can polish the brighter colored steel a bit more, imo:
At the moment, I'm inclined to prefer the baked enamel version for a darker black, but I'm coming to realize that the normal etching, while not producing really dark black, more like gray or charcoal, has its advantages and beauty, too. The main advantage being that it is bare metal and will retain its look for a long, long time.
EDIT 01-13-2012:
Getting around to completing the etching, and in some cases, the re-etching of the lights:
Last edited:
 john
john

