Derek Dean
Flashlight Enthusiast
Review of a pre-production model of the
Specialized Flux Expert Bicycle Headlight with High/Low Beam Remote Switching
By Derek Dean 10-26-14
Review light provided by Specialized Bicycles
EDIT: More reviews in this thread:
http://www.cpfmarketplace.com/mp/showthread.php?318716-SIGNUP-HAS-ENDED-Pass-Around-Giveaway-Specialized-Flux-Headlight-and-Taillight
Last August (end of August) I got an e-mail from Eric Lee, an equipment engineer for Specialized Bicycles. Eric explained that he had seen my post on CPF where I mentioned that someone ought to get one of the new Specialized FLUX Headlights and do a review.
It turns out he lives only a few miles away, and asked me if I'd be interested in trying out their 3 new bicycle lights and giving them some feedback? Duh, sure, so we met down at the local bike shop in Monterey (Bay Bikes), where he hooked me up with their 3 new lights, the Flux Expert and Elite Headlights, and the Flux Expert Taillight.
Because there is so much to talk about with these new lights, I'll limit this review to the new Specialized Flux Expert Headlight. I'll cover the Elite Headlight and the Expert Taillight in separate reviews.
First, let's look at some of the specifications:
Weight: with handlebar mounting bracket and remote control: 295 grams
Weight of the light by itself: 215 grams
Dimensions (approx.): 3.5(w) x 2(h) x 2.5(d)
Body material: Aluminum, plastic, rubber
Front Cover material: Clear Acrylic with anti-reflective coating
Bezel: Stainless Steel
LEDs: 3 x Cree XP-G2 cool white LEDs (R5 bin).
Light Output: 400 lumens - 1200 lumens
Output modes: 4 (Full Power, Low Power, Pulse, Strobe)
Submodes: 4 (FP Low Beam, LP High Beam, Pulse2, Strobe2)
Extra Functions: 2 (LIGHT HORN, Press and hold for FULL POWER)
Runtime: 1 hour 45 minutes at FULL POWER (all 3 LEDs on Full Power, 1200 lumens)
6 hours in Low Power (2 lowbeam LEDs on in low, 400 lumens)
20 hours in Strobe mode (1 center LED at high power, 400 lumens)
Power: 2x18650 2600 mAh internal non-user-replaceable lithium-ion rechargeable batteries, giving 5200 mAh output at 3.7 volts. Accepts external 3.7-4.2 volt battery packs.
Charger: Universal 100-240 volts AC 50/60 Hz (mine came with the US version AC adapter)
Charger Output: 5 volts 2.1A max.
Charge time: Approx. 3 hours to 90%, when using the supplied 2.1 amp wall charger, with 1 additional hour to achieve 100% (4 hours total to 100%),
Approx. 12 hours to 90%, when charging using the .5 amp USB output from a computer, with 1.25 additional hours to achieve 100% (13.25 hours total to 100%)
Remote control: 2 electronic switches on a wired, weather resistant aluminum chassis
Remote control cable length: 13"
External Access: 1x mini USB port, for both remote control, charging, and providing additional power via external power pack (configured for 3.7-4.2 volt input).
Beam Control: Lowbeam - Highbeam switching. Lowbeam shaped with horizontal cutoff to prevent blinding oncoming traffic.
Weather resistant: Yes, O-ring sealed
Warranty: 2 years.
Suggested Retail Price: $275

The Flux Expert Headlight comes in a small rectangular box, which contains the light (with 5200 mAh internal battery pack), handlebar mount, wired remote control, instructions, charger (including a US adapter plug and usb to mini usb charging cable), and all the hardware required to attach both the handlebar mount and the wired remote, including the only tool needed, a 4mm hex wrench (nice touch).
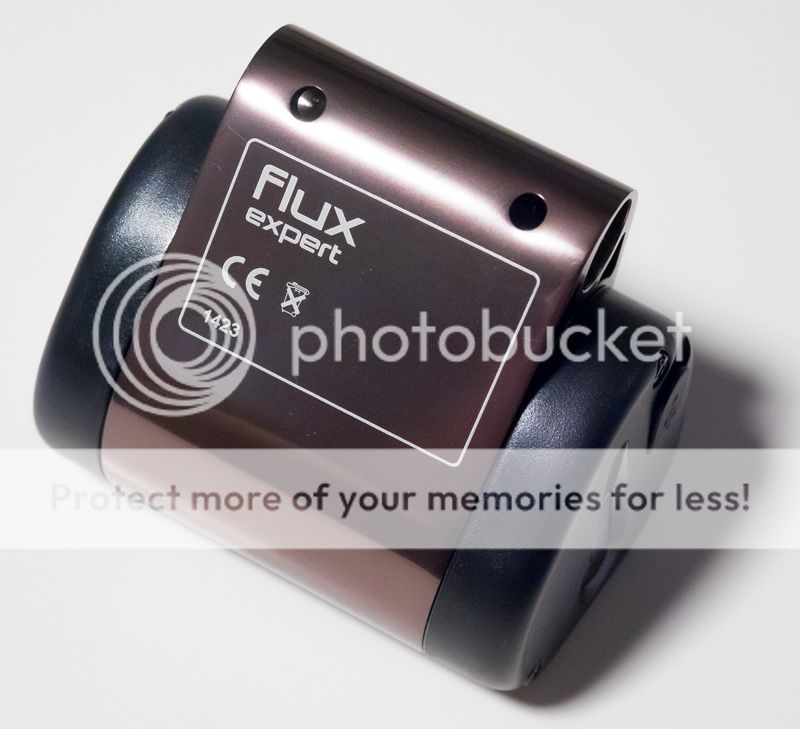
The first thing I noticed when I picked up the Flux Expert is that it feels like a quality piece of kit. It's SOLID, with beautifully sculpted lines, rounded corners, and a perfect finish from every angle. Seriously, this is a nice light. Its stylish good looks would be a welcome addition to any bike.
The second thing I noticed is the rectangular opening on the front, which houses an unusual reflector, actually 3 reflectors. The three Cree XP-G2 LEDs are located at the top of the housing, facing down and 18 degrees back, and are firing into the reflectors. Hmmmm…… it kind of looks like a modern car headlight.
Eric explained that they used the XP-G2 specifically because it's smaller size allowed them to more easily focus it's output precisely.
Unlike the usual flashlight-mounted-on-the-handlebars approach that most manufacturers use for their bike lights, which wastes half the light going up into the air, this unusual reflector design allows most of the light to be focused on the roadway, where it's needed.
The 3 LEDs are lined up in a row from left to right. The LEDs on each end are the Lowbeam lights, while the center LED's reflector is slightly raised, allowing it to be used as the Highbeam light. Each LED can run at full power (400 lumens each), or low power (200 lumens each), either continuously, strobing, or pulsing between those two levels. The Flux Expert bicycle light gets its versatility from using 11 different combinations of those 3 LEDs, including 2 power levels.
The main part of the body is a solid piece of thick aluminum which wraps around the light from the top, around the back to the bottom. Eric explained that this big chunk of metal provides a direct thermal pathway for the 3 LEDs to get rid of excess heat to the surface of the light…..and as I found out, it works. The metal surface of the light does get warm fairly quickly when you run the light in Full Power mode, indicating that the metal chassis is indeed working to keep those 3 LEDs cool.
As this thick metal piece wraps around the back of the light, it forms a circular tube that serves as the attachment point for the metal handlebar mount. Since this solid metal piece is the light's frame, this attachment point is extremely robust and rock solid.

Both end caps are made from a high quality plastic, and both feature a small clear window that lights up when the light is on, giving excellent side visibility, and since they're using the light from the main LEDs, when the light is strobing or pulsing, those side windows pulse or strobe too.
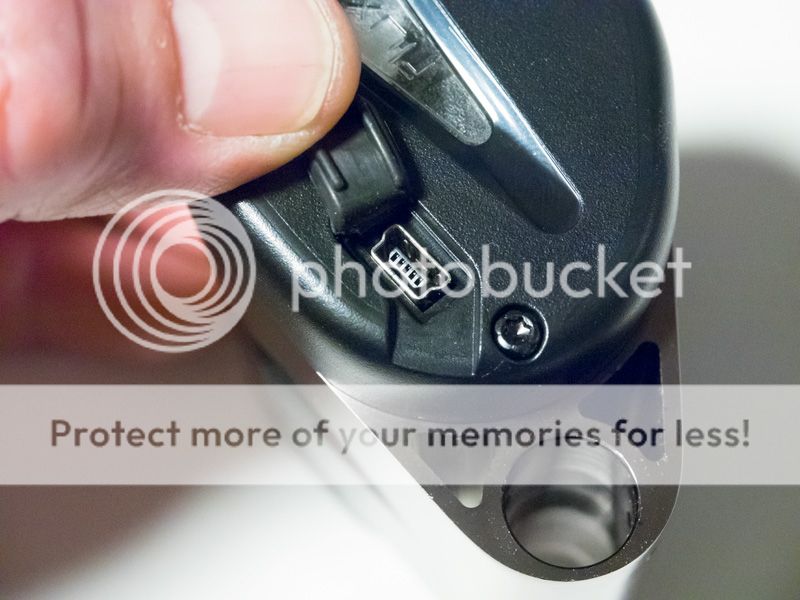
On the right side is the USB port, which has an attached rubber cover that fits securely into place to keep out dust. Eric explained that in addition to the exterior rubber cover, there is a rubber gasket inside the light, behind the USB connector, giving superior water resistance at this important connection point.

There is a single large button on the top panel with a clear "S" that glows when the light is turned on. This is the MODE button. It's made out of rubber and feels nice to the touch. It sits down inside a groove on the top, but still protrudes slightly. The light has an electronic switch that turns ON with a single, quick, firm click, and changes modes with the same single, quick, firm click. It turns OFF when you press and hold the button for more than .6 seconds. It comes on in the last mode used (mode memory).
One potential issue. Since there is no lockout mode, and the button isn't fully recessed. I could see the light being stowed in a bike bag and accidentally turned on, draining the battery. Not a huge deal, but something to be aware of.
This one button turns the light ON/OFF and gives basic access to the 4 main MODES, with access to the 4 Submodes and 2 Extra Functions only available when using the remote. I would have preferred having a second button on the light to provide full access to all the modes (in case the remote goes missing or becomes damaged), but to be honest, the 5 modes you can control from the light are the ones most likely to be used.
The 4 modes controlled from the light are:
1. FULL POWER (all 3 LEDs at full power, includes highbeam,1200 lumens)
2. Low Power (2 LEDs at low power, lowbeam only, 400 lumens)
3. Pulse (all 3 LEDs gently pulsing between 400-1200 lumens at approx. 1 pulse/sec)
4. Strobe (1 LED, center highbeam, 400 lumens at approx. 2 flashes/sec.)
By the way, the backlit MODE button on the light also serves as a battery strength indicator, both during use and during charging.
During use, when the MODE button is GREEN, the battery capacity is between 50-100%, when it changes to YELLOW it's between 20-50%, when it changes to RED it's between 5-20%, and when it starts FLASHING RED it's at 5% or below and it's time to recharge.
During charging, when the MODE button is FLASHING RED the battery is below 90% full. When it changes to FLASHING GREEN it's between 90-99% full, and when it changes to SOLID GREEN it's at 100% capacity. Approximate charge time to 100% is 4 hours, when you use the included 2.1 amp AC charger.
Before I move on, I want to talk a bit about the Instruction Manual for the Flux Expert Headlight:
http://www.specialized.com/au/en-au/ftb/lights/lights-ftb/flux-expert-headlight#manuals
I LOVE instruction manuals. Whenever I'm considering a purchase and I'm comparing products, I like to go to the manufacturer's website and, if possible, download the instruction manual.
This is typically where I can get the real information about what to expect when I open the box and hook up my new electronic wonder.
Specialized has taken a novel approach with this instruction manual. Rather than printing it in 23 different languages, they've chosen to use graphics to explain how to mount the light and remote, and how to use all the features of the light.
It took me going through the manual a few times to decipher all the symbols, but it's actually quite an elegant and thoughtful way to present the instructions so that anybody can understand them. It's obvious someone put a lot of time into it, and I found it very helpful.
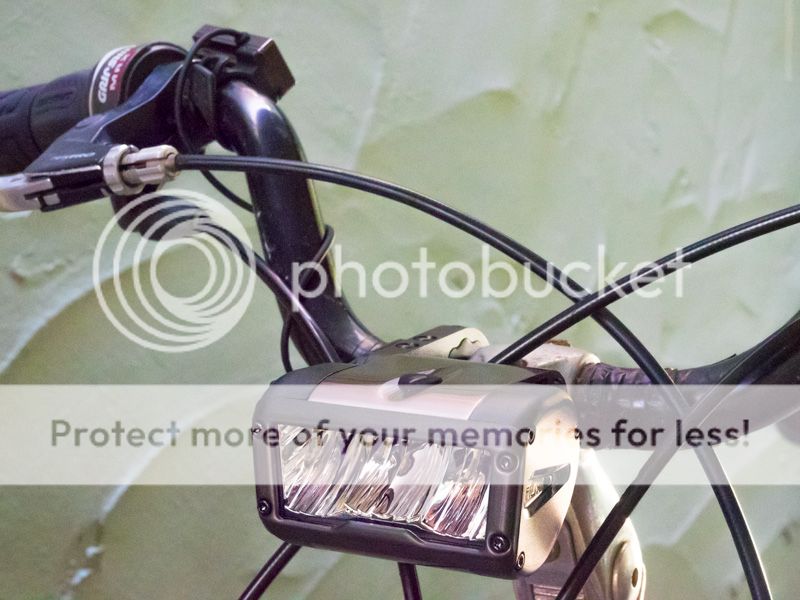
Okie dokie, let's get the light on the bike. For most people, the light will be installed by a Specialized dealer, but for the purpose of this review, let's see what's involved.

The light comes with a unique (patent pending) metal handlebar mount that attaches to handlebars sized between 25.4mm and 31.8mm (using the included inserts). The handlebar clamp has a small horizontal bar attached that runs sideways, parallel to, and in front of, the handlebars. After pushing a mechanical release button on the end, this smaller round metal bar slides into the heavy duty metal tube on the back of the light and locks into place with a rock solid and reassuring ,"click". This is a rock-solid connection, and my unit had ZERO play. The light stays put.
There are several neat things about this setup. First, while the mount attaches to the handlebars to the left or right of the top stem post; when attached, it places the light directly in the center of the handlebars. Nice.
Second, it can easily pivot up or down almost 4", giving the flexibility to have the light above the bars, at the bar level (slightly in front), or below the bars.
Of course, with a light which has a shaped beam that includes a sharp horizontal cutoff, like the Flux Expert, aiming the light is critical, not only for maximum beam coverage, but also for getting the horizontal cutoff placed correctly so you don't blind oncoming traffic.
Fortunately, the engineers at Specialized took this into account and made this important task fairly easy to achieve, all without having to turn on the light! Wow.
Using either a bubble level, or the level app on your smart phone, you simply place the level against the front of the light and make sure the front is perfectly vertical. Then tighten the two 4mm hex screws, and bingo, you're light will be perfectly aimed when you turn it on the very first time.

So, follow the instructions and put the mount together on the handlebars (using the included 4mm hex wrench), then position the mount approximately where you want it and tighten the two hex screws to 80%. Attach the light, fine tune it's position up or down, use the level to make sure the front of the light is vertical, then tighten the 2 screws on the mount to 100%. Done deal.
It does take a few minutes to get the mount set in place, but once it's installed, it's a simple matter to push the mechanical locking button and slide the light sideways to get it on or off. It takes about 3 seconds, and the light is perfectly aligned every time.
I don't know if it's possible, but I would liked to have seen a quicker and easier way to attach/detach the mount from the handlebars (thumbscrew type quick mount?). Moving the mount from bike to bike could be somewhat cumbersome. Certainly not an issue if you use only one bike.
For best results the Flux Expert should be mounted at handlebar height, but I did try it on a fork crown mount (from another light), and got quite satisfactory results on my test ride, however, for the rest of this review I mounted the light in it's ideal location at the center of the handlebars.
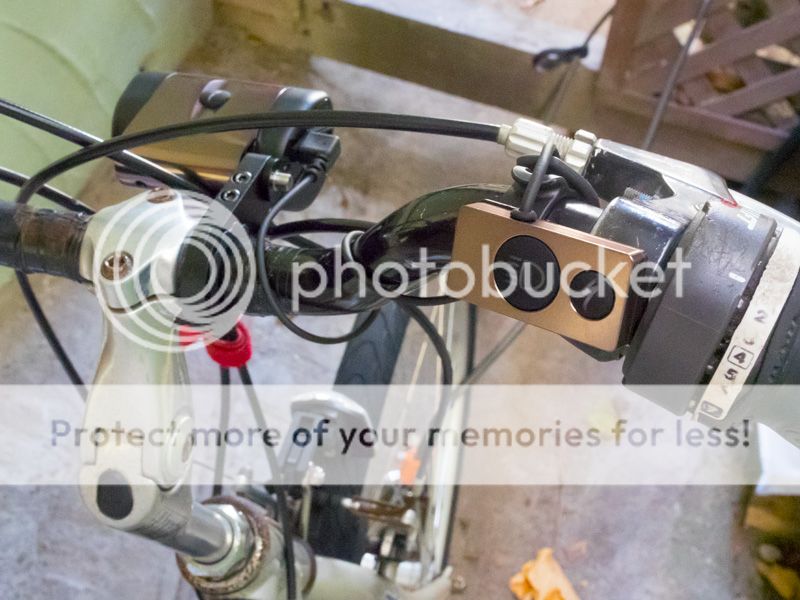
This brings us to the wired remote control:

The two button wired remote has the same excellent finish and build quality as the light, with smooth rounded edges, rubber backlit buttons, and a beautiful aluminum exterior. Eric assured me that the remote is also well sealed for use in any environment.
The remote can be attached and removed quickly and easily, as it uses a heavy duty rubber band for just that purpose. By mounting it at the outer end of the handlebar, next to the grip, you have perfect access to both buttons with your thumb, all without having to change your hand position. Very cool.
When attached to the light, the remote's right angle mini USB connector has a very firm fit, which is actually quite reassuring. I don't think there will be any issue with the plug coming loose, even during hard riding.
I do have one minor concern. Since the light depends on having the remote connected to take advantage of all 11 modes, I'd like to see a more robust cable used, more like the one that comes with the charger. I'd also like to see a larger strain relief added where the hardwired cable comes out of the remote.
One note, the backlit green MODE button on the remote does NOT change color as the battery capacity diminishes. That color changing indicator only appears with the MODE button on the light.
Onto the remote UI (user interface): The two button remote is essential for unlocking the full potential of the Flux Expert Headlight, and gives the rider easy and intuitive control over all functions. Somebody who actually rides, put a lot of thought into what a rider needs from their light and how to accomplish that with as few button pushes as possible.
Here is a quick rundown of how it works:
First, you need to turn the light ON, which can only be done by quickly pressing the MODE button on the light (press to long and the light comes on and goes off). The light comes on in the last mode used (mode memory), and then the back lit buttons light up on both the light and the remote control.
Notice that the two buttons on the remote are different sizes and use different back lit colors. Both of those differences help make it easy to quickly find the right button in the dark. There is a big backlit blue button. That is the HIGHBEAM Button. Then there is a smaller backlit green "S" button (the same as on the light). That is the MODE Button.
The Smaller Green MODE Button:
After the light is ON, a quick press of the green MODE button, either on the light or on the remote, steps the light through the 4 basic modes, in this order (although the light comes on in the last mode used, Mode Memory):
Full Output (all 3 LEDs at high power, including high beam),
Low Output (2 LEDs, low power, low beam),
Pulse (3 LEDs pulsing, including high beam),
Strobe (1 LED, in High Beam, high power mode).
It will continue cycling in this order until you stop clicking it.
To turn the light OFF, press and hold the green MODE button at any time, either on the remote or on the light.
The Big Blue HIGHBEAM button:
The big blue HIGH BEAM button actually has THREE different functions, depending on how long you press it.
1. IN ANY of the 4 main MODES, a very quick TAP of the big blue HIGH BEAM button, less than .2 seconds, calls up a VERY FAST and brief (about 1 sec.) attention getting strobe (all 3 LEDs at FULL POWER, 1200 lumens).
Specialized calls this the LIGHT HORN (a very appropriate name), and it's PERFECT for quickly getting somebody's attention without blinding them. For instance, a car getting ready to pull out in front of you, or somebody opening a car door, or….. well….. you get the idea. It's brief enough not to annoy people, but it WILL get their attention, and it immediately goes back to the last mode you were using.
This is very cool, and I think it will be extremely useful for road riders, day or night. With the remote situated by your thumb, you don't even have to take your eyes off the road, just a quick TAP of the HIGH BEAM button, and BAM, you're noticed. (This is shown in the manual with a big blue exclamation point surrounded by radiating red lines).
2. IN ANY of the 4 main MODES, press and hold the big blue HIGH BEAM button longer than .6 seconds and the light immediately goes to constant FULL POWER MODE (all 3 LEDs at full power, 1200 lumens with high beam). This time it stays in the FULL POWER MODE until you switch modes again.
Use this when you are in Low Power Mode (or any other mode) and want to quickly get back to Full Power Mode without stepping through Pulse and Strobe Modes. No thinking, just press and hold and you have the instant FULL POWER output of all 3 LEDs.
3. Access Submodes. Use the big blue HIGHBEAM button to modify each of the 4 main modes (FULL POWER, LOW POWER, PULSE, STROBE). When using either the FULL POWER or LOW POWER modes, you can switch back and forth between Highbeam and Lowbeam by repeatedly pressing big blue HIGHBEAM button.
When in the PULSE mode, you can switch back and forth between 2 versions of the PULSE mode, and when in the STROBE mode you can switch back and forth between two versions of the STROBE mode.
You do this 'switching back and forth' by pressing the big blue HIGHBEAM button for more than .2 seconds but less than .6 seconds.
So, for the big blue HIGHBEAM button:
Press less than .2 sec. = LIGHT HORN
Press more than .2 sec. but less than .6 sec.= Change to submode or back
Press more than .6 sec = FULL POWER
LOL, I know it sounds weird, but it's MUCH easier than it reads. It only took me a few minutes to become comfortable with using the big blue HIGHBEAM button to quickly access any of those neat features.
That's about it for the UI. I found it to be very logical and intuitive, and quickly came to appreciate how much thought went into its design.
POWER SOURCE: The Flux Expert comes with two internal 18650 size 2600 mAh lithium-ion rechargeable batteries (giving 5200 mAh at 3.7 volts), which are not user replaceable. Some CPF members might prefer to have had the option to supply and install their own batteries, however, I think many folks will appreciate being able to simply plug the light straight into the charger.
Typically, these type of lithium-ion rechargeable batteries will last for many years, but in the event they need replacing, you'll be able to take the light to your local Specialized dealer for that service (or send it to the company).
By the way, the same USB port that accepts the wired remote control is also used to charge the batteries AND provide a way of using an external 3.7 volt battery pack, although I'm not sure how that will work when also using the remote control.

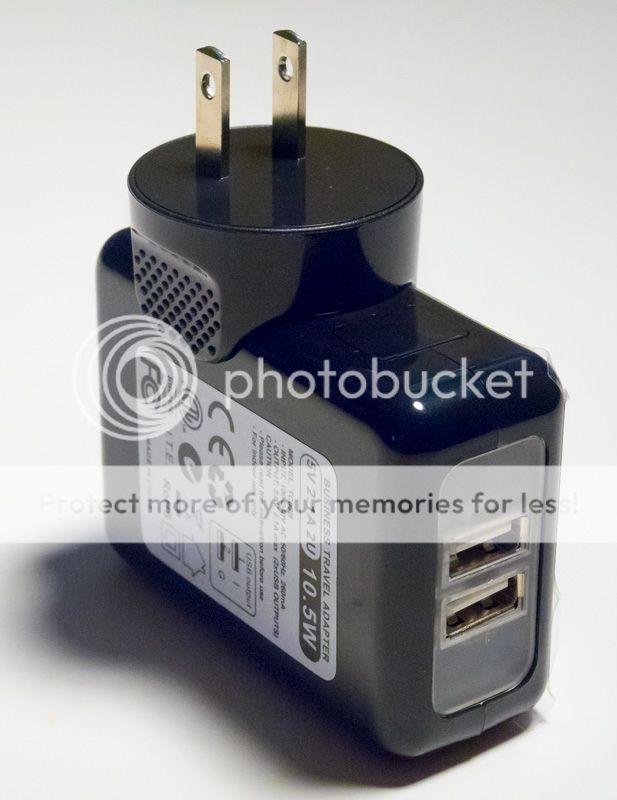
The light comes with a world-wide universal 100-240 volt 50/60 Hz battery charger. It's designed to accept an AC adapter plug for the country where it's sold. Mine came with the North American version non-grounded AC plug. The adapter easily attaches to the charger and has a firm fit that assures it will stay put. The charger outputs 2.1 amps, for fairly quick charging of the light's 5200 mAh internal battery pack (4 hours to 100%).
It comes with a beefy, but fairly short 10" USB to mini USB cable that plugs from the charger into the light's mini USB port. Eric explained that they decided to keep this cord short to lower the resistance in the cable and provide maximum charging power for the battery. The charger's front panel has two USB outputs and a nice blue glow while it's in use. By the way, you'll notice I left the protective plastic on the charger. Since this system is a loaner, I wanted it to go back still looking like new.
It takes about 4 hours for a full charge using the included 2.1 amp charger (3 hours to 90%). The MODE button on top of the light changes color to give you instant readout of the charging status, FLASHING RED until it reaches 90%, then FLASHING GREEN until it reaches 100%, where it finally turns SOLID GREEN.
You can also charge the light from the powered USB port on a computer, but since those generally only provide .5 amps output, it will likely take 13.5 hours for a full charge.
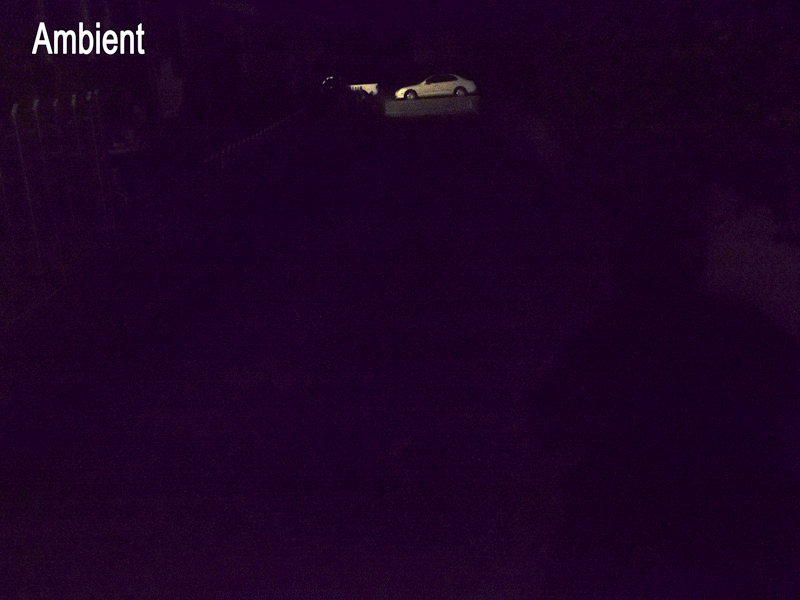
That's enough of the fine print, it's 11:00 pm and dark, dark, dark……let's go for a ride!
Wow, that was fun. I just spent 2 1/2 hours tooling around down at the Monterey Wharf, on the bike trail, and over at Lake El Estero. It was perfect summer night biking weather….. warm, calm, and no traffic.
By the way, I worked hard to make sure these images came very close to matching what I was seeing. Each series had the photos taken in manual mode with the same shutter speed, aperture, etc.
I quickly found that having so much control and power at my fingertips was highly addictive.

The LOW POWER mode (400 lumens, no high beam) is PERFECT for cruising around an urban environment with lots of ambient lighting. It was just a bit brighter than the street lights and bike trail lights, but not so bright as to appear too different, which is easier on the eyes during a long ride under that type of lighting.
Of course it's nice to be able to kick on the High Beam (which brings it up to 600 lumens total in Low Power mode), as it really lights up all the street signs, and then when needed, it's just as easy to kick it back down to Low Beam. Very cool.
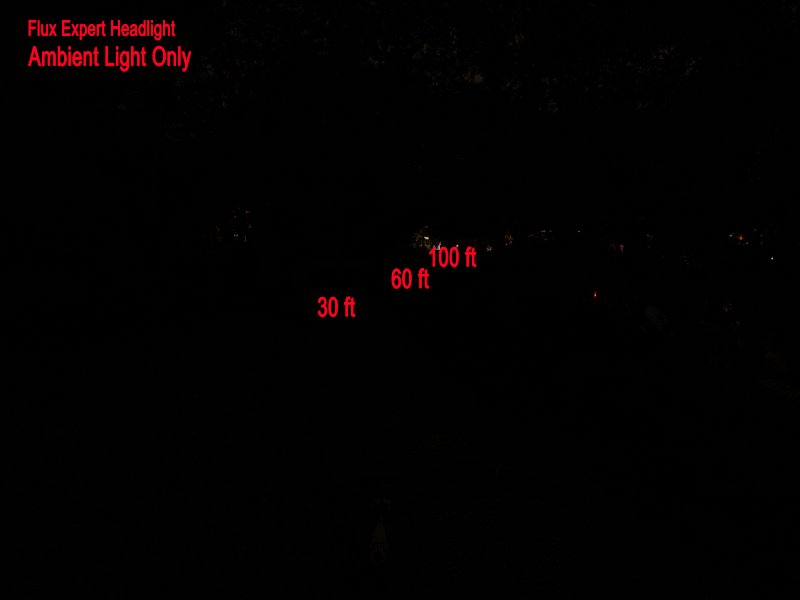
Most of the bike trail lights are 150 feet apart (or more when some are burned out), leaving big dark areas in between. The LOW POWER mode filled in those areas beautifully without feeling like I was going from light to dark. It's a very pleasant experience to have the headlight match the ambient lighting so well.
And, because the horizontal cutoff really does work, it was nice knowing that I wasn't blinding cars on the street, or pedestrians and other riders on the bike trail. I even got off my bike, propped it up against a light pole and walked back about 80 feet, taking two photos in LOW POWER mode, one with the Low Beam on, and one with the High Beam on.

Man, what a difference. Walking toward the bike with the Low Beam on was not bad at all. It just looked like the bike had a light. It was VERY visible, but not blinding at all, and yet, when I kicked on the high beam it was quite a different story. It WAS blinding.
So, for bike trail riding, or riding under street lights, the Low Power mode seems to be the ticket, which is great, since I should get around 6 hours of runtime that way. Of course, there did come a point where I turned off the lit bike trail onto an unlit backroad that headed down toward the beach, and it was neat being able to just hold down the big blue HIGH BEAM button and kick the Flux Expert into that beautiful 1200 lumen FULL POWER mode with all 3 LEDs blazing away.
Even though I'd never been down that road before, I had no hesitation, even at midnight, because I had no problem seeing everything in my path.
I came back by way of the trail around Lake El Estero, which is very dark, and again, the FULL POWER mode lit the way, leaving no doubt about what was ahead.
By the way, I did try the Pulse and Strobe modes, and they work beautifully, but because they both have the center Highbeam LED on all the time, I felt they would be better suited for daytime riding or riding with traffic at night (which I try not to do).
What I did use often was the big blue HIGH BEAM button. When I was in the LOW POWER mode it was great not having to cycle through all the other modes to get to the HIGH POWER mode. I just held down the HIGH BEAM button and presto, instant FULL POWER mode. Then I only had to click the green MODE button once to switch back to LOW POWER mode.
That, and using the HIGH BEAM button to switch between High Beam and Low Beam, in either HIGH POWER or LOW POWER modes. Fantastic.
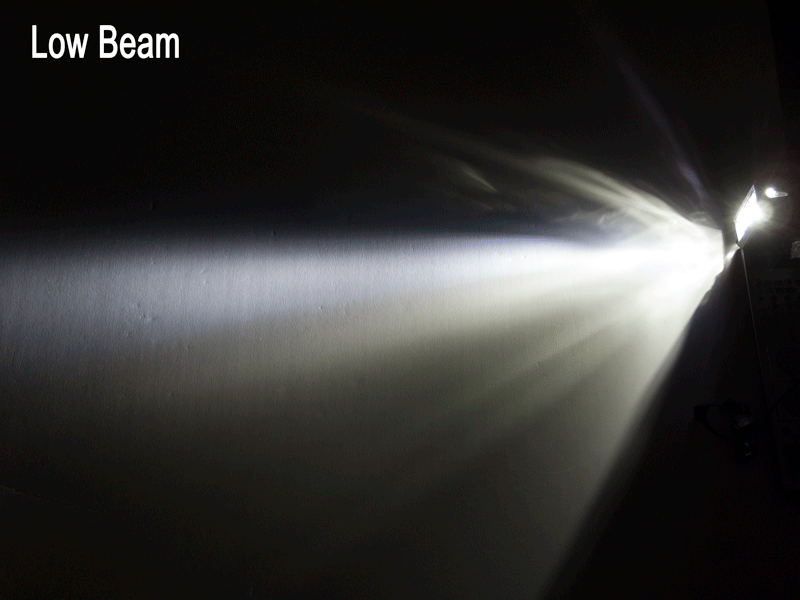
Beam characteristics: First, let's discuss the tint, because, as many of you know, I'm a tint geek. I was surprised at how much I like the tint of these cool white XP-G2 LEDs. They give off light with a very CLEAN white appearance. Yes, a bit on the cool side, but for the first time in a while, I didn't feel the need to filter it.
Here is a view of beam from side, shown along a white wall:
I'm not sure how Specialized measured the output of their headlight, but I did a quick bathroom bounce test comparing it to my new ZL SC62w, rated at 930 lumens on turbo, and the Flux Expert Headlight was substantially brighter on FULL POWER mode with all 3 LEDs turned on.
As to the beam pattern, one of my top priorities for a bike light is having a beam that does NOT blind oncoming traffic, meaning it needs to have a good horizontal cutoff. Second on the list is having a beam that is evenly lit from front to back (and side to side), without any hotspots. For me, it's these two primary characteristics that define a "bicycle headlight" as opposed to a flashlight that is being used on a bicycle.
 I was very pleased with how well the Flux Expert handled both of these important characteristics. In Low Beam mode, it's horizontal cutoff is well defined, placing the beam at about mid-chest height as it exits the light. This is high enough to see side markers and railings on the road and make your bike highly visible, but just low enough to keep from annoying oncoming traffic.
The main beam stretches evenly from the bike wheel (yes, the bike wheel) out to about 80 feet, then tapers off slightly out to 120-140 feet. It has a fair amount of side spill, enough to feel comfortable going around corners.
One thing that sets the Flux Expert apart from many other lights is its Lowbeam/Highbeam switching capability. I left the light on Lowbeam for most of my urban riding, but when I did kick on the Highbeam, it easily lit up street signs 2 blocks away. Even more, when I hit the unlit trails around the lake, the extra punch and height of the Highbeam were greatly appreciated.
All-in all, a very well designed and rider friendly beam.
So, there you go. I great new headlight from Specialized, with build quality made to last, and top-of-class useful features for riding out in the real world, night OR day.
To wrap it up, here are what I see as the pros and cons:
PROs:
1. Outstanding build quality.
2. Rugged, easy to use mounting system (once it's mounted).
3. Remote control for Mode selection and Lowbeam/Highbeam selection.
4. Built in lithium-ion batteries for easy, no hassle charging.
5. Accepts 3.7-4.2 volt external battery pack.
6. Easy to see battery strength indicator on top of light.
7. Weather resistant design.
8. 4 Main Modes, 4 Submodes, and 2 extra Functions.
9. Very even beam pattern from front to back and side to side.
10. Lowbeam has excellent horizontal cutoff, won't blind oncoming traffic.
11. Easy aiming of light, even with light OFF.
12. LIGHT HORN.
13. Two year warranty.
CONs:
1. Price (but you do get what you pay for).
2. Batteries not user replaceable (can be replaced by Specialized dealer).
3. Must use the remote to access Submodes and extra functions.
4. Remote cable could be more robust.
5. Potential accidental turn ON because of protruding MODE button on light.
6. Mount could be easier to attach and detach.
Yes, it costs more than other lights out there, but after using it for several months, I can tell you that once you've ridden with it, you'll appreciate just how well your money was spent.
I feel with the release of the FLUX Expert Headlight, the folks at Specialized have produced an exciting new addition for the world of bicycle lighting.
Thanks again to Eric Lee at Specialized for providing the Flux Expert Headlight for this review, and making himself available to answer my many questions.
I'll have the reviews for the Flux Elite Headlight and Flux Expert Taillight up soon.
Happy trails!~
Derek
Specialized Flux Expert Bicycle Headlight with High/Low Beam Remote Switching
By Derek Dean 10-26-14
Review light provided by Specialized Bicycles
EDIT: More reviews in this thread:
http://www.cpfmarketplace.com/mp/showthread.php?318716-SIGNUP-HAS-ENDED-Pass-Around-Giveaway-Specialized-Flux-Headlight-and-Taillight
Last August (end of August) I got an e-mail from Eric Lee, an equipment engineer for Specialized Bicycles. Eric explained that he had seen my post on CPF where I mentioned that someone ought to get one of the new Specialized FLUX Headlights and do a review.
It turns out he lives only a few miles away, and asked me if I'd be interested in trying out their 3 new bicycle lights and giving them some feedback? Duh, sure, so we met down at the local bike shop in Monterey (Bay Bikes), where he hooked me up with their 3 new lights, the Flux Expert and Elite Headlights, and the Flux Expert Taillight.
Because there is so much to talk about with these new lights, I'll limit this review to the new Specialized Flux Expert Headlight. I'll cover the Elite Headlight and the Expert Taillight in separate reviews.
First, let's look at some of the specifications:
Weight: with handlebar mounting bracket and remote control: 295 grams
Weight of the light by itself: 215 grams
Dimensions (approx.): 3.5(w) x 2(h) x 2.5(d)
Body material: Aluminum, plastic, rubber
Front Cover material: Clear Acrylic with anti-reflective coating
Bezel: Stainless Steel
LEDs: 3 x Cree XP-G2 cool white LEDs (R5 bin).
Light Output: 400 lumens - 1200 lumens
Output modes: 4 (Full Power, Low Power, Pulse, Strobe)
Submodes: 4 (FP Low Beam, LP High Beam, Pulse2, Strobe2)
Extra Functions: 2 (LIGHT HORN, Press and hold for FULL POWER)
Runtime: 1 hour 45 minutes at FULL POWER (all 3 LEDs on Full Power, 1200 lumens)
6 hours in Low Power (2 lowbeam LEDs on in low, 400 lumens)
20 hours in Strobe mode (1 center LED at high power, 400 lumens)
Power: 2x18650 2600 mAh internal non-user-replaceable lithium-ion rechargeable batteries, giving 5200 mAh output at 3.7 volts. Accepts external 3.7-4.2 volt battery packs.
Charger: Universal 100-240 volts AC 50/60 Hz (mine came with the US version AC adapter)
Charger Output: 5 volts 2.1A max.
Charge time: Approx. 3 hours to 90%, when using the supplied 2.1 amp wall charger, with 1 additional hour to achieve 100% (4 hours total to 100%),
Approx. 12 hours to 90%, when charging using the .5 amp USB output from a computer, with 1.25 additional hours to achieve 100% (13.25 hours total to 100%)
Remote control: 2 electronic switches on a wired, weather resistant aluminum chassis
Remote control cable length: 13"
External Access: 1x mini USB port, for both remote control, charging, and providing additional power via external power pack (configured for 3.7-4.2 volt input).
Beam Control: Lowbeam - Highbeam switching. Lowbeam shaped with horizontal cutoff to prevent blinding oncoming traffic.
Weather resistant: Yes, O-ring sealed
Warranty: 2 years.
Suggested Retail Price: $275

The Flux Expert Headlight comes in a small rectangular box, which contains the light (with 5200 mAh internal battery pack), handlebar mount, wired remote control, instructions, charger (including a US adapter plug and usb to mini usb charging cable), and all the hardware required to attach both the handlebar mount and the wired remote, including the only tool needed, a 4mm hex wrench (nice touch).
The first thing I noticed when I picked up the Flux Expert is that it feels like a quality piece of kit. It's SOLID, with beautifully sculpted lines, rounded corners, and a perfect finish from every angle. Seriously, this is a nice light. Its stylish good looks would be a welcome addition to any bike.
The second thing I noticed is the rectangular opening on the front, which houses an unusual reflector, actually 3 reflectors. The three Cree XP-G2 LEDs are located at the top of the housing, facing down and 18 degrees back, and are firing into the reflectors. Hmmmm…… it kind of looks like a modern car headlight.
Eric explained that they used the XP-G2 specifically because it's smaller size allowed them to more easily focus it's output precisely.
Unlike the usual flashlight-mounted-on-the-handlebars approach that most manufacturers use for their bike lights, which wastes half the light going up into the air, this unusual reflector design allows most of the light to be focused on the roadway, where it's needed.
The 3 LEDs are lined up in a row from left to right. The LEDs on each end are the Lowbeam lights, while the center LED's reflector is slightly raised, allowing it to be used as the Highbeam light. Each LED can run at full power (400 lumens each), or low power (200 lumens each), either continuously, strobing, or pulsing between those two levels. The Flux Expert bicycle light gets its versatility from using 11 different combinations of those 3 LEDs, including 2 power levels.
The main part of the body is a solid piece of thick aluminum which wraps around the light from the top, around the back to the bottom. Eric explained that this big chunk of metal provides a direct thermal pathway for the 3 LEDs to get rid of excess heat to the surface of the light…..and as I found out, it works. The metal surface of the light does get warm fairly quickly when you run the light in Full Power mode, indicating that the metal chassis is indeed working to keep those 3 LEDs cool.
As this thick metal piece wraps around the back of the light, it forms a circular tube that serves as the attachment point for the metal handlebar mount. Since this solid metal piece is the light's frame, this attachment point is extremely robust and rock solid.
Both end caps are made from a high quality plastic, and both feature a small clear window that lights up when the light is on, giving excellent side visibility, and since they're using the light from the main LEDs, when the light is strobing or pulsing, those side windows pulse or strobe too.
On the right side is the USB port, which has an attached rubber cover that fits securely into place to keep out dust. Eric explained that in addition to the exterior rubber cover, there is a rubber gasket inside the light, behind the USB connector, giving superior water resistance at this important connection point.
There is a single large button on the top panel with a clear "S" that glows when the light is turned on. This is the MODE button. It's made out of rubber and feels nice to the touch. It sits down inside a groove on the top, but still protrudes slightly. The light has an electronic switch that turns ON with a single, quick, firm click, and changes modes with the same single, quick, firm click. It turns OFF when you press and hold the button for more than .6 seconds. It comes on in the last mode used (mode memory).
One potential issue. Since there is no lockout mode, and the button isn't fully recessed. I could see the light being stowed in a bike bag and accidentally turned on, draining the battery. Not a huge deal, but something to be aware of.
This one button turns the light ON/OFF and gives basic access to the 4 main MODES, with access to the 4 Submodes and 2 Extra Functions only available when using the remote. I would have preferred having a second button on the light to provide full access to all the modes (in case the remote goes missing or becomes damaged), but to be honest, the 5 modes you can control from the light are the ones most likely to be used.
The 4 modes controlled from the light are:
1. FULL POWER (all 3 LEDs at full power, includes highbeam,1200 lumens)
2. Low Power (2 LEDs at low power, lowbeam only, 400 lumens)
3. Pulse (all 3 LEDs gently pulsing between 400-1200 lumens at approx. 1 pulse/sec)
4. Strobe (1 LED, center highbeam, 400 lumens at approx. 2 flashes/sec.)
By the way, the backlit MODE button on the light also serves as a battery strength indicator, both during use and during charging.
During use, when the MODE button is GREEN, the battery capacity is between 50-100%, when it changes to YELLOW it's between 20-50%, when it changes to RED it's between 5-20%, and when it starts FLASHING RED it's at 5% or below and it's time to recharge.
During charging, when the MODE button is FLASHING RED the battery is below 90% full. When it changes to FLASHING GREEN it's between 90-99% full, and when it changes to SOLID GREEN it's at 100% capacity. Approximate charge time to 100% is 4 hours, when you use the included 2.1 amp AC charger.
Before I move on, I want to talk a bit about the Instruction Manual for the Flux Expert Headlight:
http://www.specialized.com/au/en-au/ftb/lights/lights-ftb/flux-expert-headlight#manuals
I LOVE instruction manuals. Whenever I'm considering a purchase and I'm comparing products, I like to go to the manufacturer's website and, if possible, download the instruction manual.
This is typically where I can get the real information about what to expect when I open the box and hook up my new electronic wonder.
Specialized has taken a novel approach with this instruction manual. Rather than printing it in 23 different languages, they've chosen to use graphics to explain how to mount the light and remote, and how to use all the features of the light.
It took me going through the manual a few times to decipher all the symbols, but it's actually quite an elegant and thoughtful way to present the instructions so that anybody can understand them. It's obvious someone put a lot of time into it, and I found it very helpful.
Okie dokie, let's get the light on the bike. For most people, the light will be installed by a Specialized dealer, but for the purpose of this review, let's see what's involved.
The light comes with a unique (patent pending) metal handlebar mount that attaches to handlebars sized between 25.4mm and 31.8mm (using the included inserts). The handlebar clamp has a small horizontal bar attached that runs sideways, parallel to, and in front of, the handlebars. After pushing a mechanical release button on the end, this smaller round metal bar slides into the heavy duty metal tube on the back of the light and locks into place with a rock solid and reassuring ,"click". This is a rock-solid connection, and my unit had ZERO play. The light stays put.
There are several neat things about this setup. First, while the mount attaches to the handlebars to the left or right of the top stem post; when attached, it places the light directly in the center of the handlebars. Nice.
Second, it can easily pivot up or down almost 4", giving the flexibility to have the light above the bars, at the bar level (slightly in front), or below the bars.
Of course, with a light which has a shaped beam that includes a sharp horizontal cutoff, like the Flux Expert, aiming the light is critical, not only for maximum beam coverage, but also for getting the horizontal cutoff placed correctly so you don't blind oncoming traffic.
Fortunately, the engineers at Specialized took this into account and made this important task fairly easy to achieve, all without having to turn on the light! Wow.
Using either a bubble level, or the level app on your smart phone, you simply place the level against the front of the light and make sure the front is perfectly vertical. Then tighten the two 4mm hex screws, and bingo, you're light will be perfectly aimed when you turn it on the very first time.
So, follow the instructions and put the mount together on the handlebars (using the included 4mm hex wrench), then position the mount approximately where you want it and tighten the two hex screws to 80%. Attach the light, fine tune it's position up or down, use the level to make sure the front of the light is vertical, then tighten the 2 screws on the mount to 100%. Done deal.
It does take a few minutes to get the mount set in place, but once it's installed, it's a simple matter to push the mechanical locking button and slide the light sideways to get it on or off. It takes about 3 seconds, and the light is perfectly aligned every time.
I don't know if it's possible, but I would liked to have seen a quicker and easier way to attach/detach the mount from the handlebars (thumbscrew type quick mount?). Moving the mount from bike to bike could be somewhat cumbersome. Certainly not an issue if you use only one bike.
For best results the Flux Expert should be mounted at handlebar height, but I did try it on a fork crown mount (from another light), and got quite satisfactory results on my test ride, however, for the rest of this review I mounted the light in it's ideal location at the center of the handlebars.
This brings us to the wired remote control:
The two button wired remote has the same excellent finish and build quality as the light, with smooth rounded edges, rubber backlit buttons, and a beautiful aluminum exterior. Eric assured me that the remote is also well sealed for use in any environment.
The remote can be attached and removed quickly and easily, as it uses a heavy duty rubber band for just that purpose. By mounting it at the outer end of the handlebar, next to the grip, you have perfect access to both buttons with your thumb, all without having to change your hand position. Very cool.
When attached to the light, the remote's right angle mini USB connector has a very firm fit, which is actually quite reassuring. I don't think there will be any issue with the plug coming loose, even during hard riding.
I do have one minor concern. Since the light depends on having the remote connected to take advantage of all 11 modes, I'd like to see a more robust cable used, more like the one that comes with the charger. I'd also like to see a larger strain relief added where the hardwired cable comes out of the remote.
One note, the backlit green MODE button on the remote does NOT change color as the battery capacity diminishes. That color changing indicator only appears with the MODE button on the light.
Onto the remote UI (user interface): The two button remote is essential for unlocking the full potential of the Flux Expert Headlight, and gives the rider easy and intuitive control over all functions. Somebody who actually rides, put a lot of thought into what a rider needs from their light and how to accomplish that with as few button pushes as possible.
Here is a quick rundown of how it works:
First, you need to turn the light ON, which can only be done by quickly pressing the MODE button on the light (press to long and the light comes on and goes off). The light comes on in the last mode used (mode memory), and then the back lit buttons light up on both the light and the remote control.
Notice that the two buttons on the remote are different sizes and use different back lit colors. Both of those differences help make it easy to quickly find the right button in the dark. There is a big backlit blue button. That is the HIGHBEAM Button. Then there is a smaller backlit green "S" button (the same as on the light). That is the MODE Button.
The Smaller Green MODE Button:
After the light is ON, a quick press of the green MODE button, either on the light or on the remote, steps the light through the 4 basic modes, in this order (although the light comes on in the last mode used, Mode Memory):
Full Output (all 3 LEDs at high power, including high beam),
Low Output (2 LEDs, low power, low beam),
Pulse (3 LEDs pulsing, including high beam),
Strobe (1 LED, in High Beam, high power mode).
It will continue cycling in this order until you stop clicking it.
To turn the light OFF, press and hold the green MODE button at any time, either on the remote or on the light.
The Big Blue HIGHBEAM button:
The big blue HIGH BEAM button actually has THREE different functions, depending on how long you press it.
1. IN ANY of the 4 main MODES, a very quick TAP of the big blue HIGH BEAM button, less than .2 seconds, calls up a VERY FAST and brief (about 1 sec.) attention getting strobe (all 3 LEDs at FULL POWER, 1200 lumens).
Specialized calls this the LIGHT HORN (a very appropriate name), and it's PERFECT for quickly getting somebody's attention without blinding them. For instance, a car getting ready to pull out in front of you, or somebody opening a car door, or….. well….. you get the idea. It's brief enough not to annoy people, but it WILL get their attention, and it immediately goes back to the last mode you were using.
This is very cool, and I think it will be extremely useful for road riders, day or night. With the remote situated by your thumb, you don't even have to take your eyes off the road, just a quick TAP of the HIGH BEAM button, and BAM, you're noticed. (This is shown in the manual with a big blue exclamation point surrounded by radiating red lines).
2. IN ANY of the 4 main MODES, press and hold the big blue HIGH BEAM button longer than .6 seconds and the light immediately goes to constant FULL POWER MODE (all 3 LEDs at full power, 1200 lumens with high beam). This time it stays in the FULL POWER MODE until you switch modes again.
Use this when you are in Low Power Mode (or any other mode) and want to quickly get back to Full Power Mode without stepping through Pulse and Strobe Modes. No thinking, just press and hold and you have the instant FULL POWER output of all 3 LEDs.
3. Access Submodes. Use the big blue HIGHBEAM button to modify each of the 4 main modes (FULL POWER, LOW POWER, PULSE, STROBE). When using either the FULL POWER or LOW POWER modes, you can switch back and forth between Highbeam and Lowbeam by repeatedly pressing big blue HIGHBEAM button.
When in the PULSE mode, you can switch back and forth between 2 versions of the PULSE mode, and when in the STROBE mode you can switch back and forth between two versions of the STROBE mode.
You do this 'switching back and forth' by pressing the big blue HIGHBEAM button for more than .2 seconds but less than .6 seconds.
So, for the big blue HIGHBEAM button:
Press less than .2 sec. = LIGHT HORN
Press more than .2 sec. but less than .6 sec.= Change to submode or back
Press more than .6 sec = FULL POWER
LOL, I know it sounds weird, but it's MUCH easier than it reads. It only took me a few minutes to become comfortable with using the big blue HIGHBEAM button to quickly access any of those neat features.
That's about it for the UI. I found it to be very logical and intuitive, and quickly came to appreciate how much thought went into its design.
POWER SOURCE: The Flux Expert comes with two internal 18650 size 2600 mAh lithium-ion rechargeable batteries (giving 5200 mAh at 3.7 volts), which are not user replaceable. Some CPF members might prefer to have had the option to supply and install their own batteries, however, I think many folks will appreciate being able to simply plug the light straight into the charger.
Typically, these type of lithium-ion rechargeable batteries will last for many years, but in the event they need replacing, you'll be able to take the light to your local Specialized dealer for that service (or send it to the company).
By the way, the same USB port that accepts the wired remote control is also used to charge the batteries AND provide a way of using an external 3.7 volt battery pack, although I'm not sure how that will work when also using the remote control.
The light comes with a world-wide universal 100-240 volt 50/60 Hz battery charger. It's designed to accept an AC adapter plug for the country where it's sold. Mine came with the North American version non-grounded AC plug. The adapter easily attaches to the charger and has a firm fit that assures it will stay put. The charger outputs 2.1 amps, for fairly quick charging of the light's 5200 mAh internal battery pack (4 hours to 100%).
It comes with a beefy, but fairly short 10" USB to mini USB cable that plugs from the charger into the light's mini USB port. Eric explained that they decided to keep this cord short to lower the resistance in the cable and provide maximum charging power for the battery. The charger's front panel has two USB outputs and a nice blue glow while it's in use. By the way, you'll notice I left the protective plastic on the charger. Since this system is a loaner, I wanted it to go back still looking like new.
It takes about 4 hours for a full charge using the included 2.1 amp charger (3 hours to 90%). The MODE button on top of the light changes color to give you instant readout of the charging status, FLASHING RED until it reaches 90%, then FLASHING GREEN until it reaches 100%, where it finally turns SOLID GREEN.
You can also charge the light from the powered USB port on a computer, but since those generally only provide .5 amps output, it will likely take 13.5 hours for a full charge.
That's enough of the fine print, it's 11:00 pm and dark, dark, dark……let's go for a ride!
Wow, that was fun. I just spent 2 1/2 hours tooling around down at the Monterey Wharf, on the bike trail, and over at Lake El Estero. It was perfect summer night biking weather….. warm, calm, and no traffic.
By the way, I worked hard to make sure these images came very close to matching what I was seeing. Each series had the photos taken in manual mode with the same shutter speed, aperture, etc.
I quickly found that having so much control and power at my fingertips was highly addictive.
The LOW POWER mode (400 lumens, no high beam) is PERFECT for cruising around an urban environment with lots of ambient lighting. It was just a bit brighter than the street lights and bike trail lights, but not so bright as to appear too different, which is easier on the eyes during a long ride under that type of lighting.
Of course it's nice to be able to kick on the High Beam (which brings it up to 600 lumens total in Low Power mode), as it really lights up all the street signs, and then when needed, it's just as easy to kick it back down to Low Beam. Very cool.
Most of the bike trail lights are 150 feet apart (or more when some are burned out), leaving big dark areas in between. The LOW POWER mode filled in those areas beautifully without feeling like I was going from light to dark. It's a very pleasant experience to have the headlight match the ambient lighting so well.
And, because the horizontal cutoff really does work, it was nice knowing that I wasn't blinding cars on the street, or pedestrians and other riders on the bike trail. I even got off my bike, propped it up against a light pole and walked back about 80 feet, taking two photos in LOW POWER mode, one with the Low Beam on, and one with the High Beam on.
Man, what a difference. Walking toward the bike with the Low Beam on was not bad at all. It just looked like the bike had a light. It was VERY visible, but not blinding at all, and yet, when I kicked on the high beam it was quite a different story. It WAS blinding.
So, for bike trail riding, or riding under street lights, the Low Power mode seems to be the ticket, which is great, since I should get around 6 hours of runtime that way. Of course, there did come a point where I turned off the lit bike trail onto an unlit backroad that headed down toward the beach, and it was neat being able to just hold down the big blue HIGH BEAM button and kick the Flux Expert into that beautiful 1200 lumen FULL POWER mode with all 3 LEDs blazing away.
Even though I'd never been down that road before, I had no hesitation, even at midnight, because I had no problem seeing everything in my path.
I came back by way of the trail around Lake El Estero, which is very dark, and again, the FULL POWER mode lit the way, leaving no doubt about what was ahead.
By the way, I did try the Pulse and Strobe modes, and they work beautifully, but because they both have the center Highbeam LED on all the time, I felt they would be better suited for daytime riding or riding with traffic at night (which I try not to do).
What I did use often was the big blue HIGH BEAM button. When I was in the LOW POWER mode it was great not having to cycle through all the other modes to get to the HIGH POWER mode. I just held down the HIGH BEAM button and presto, instant FULL POWER mode. Then I only had to click the green MODE button once to switch back to LOW POWER mode.
That, and using the HIGH BEAM button to switch between High Beam and Low Beam, in either HIGH POWER or LOW POWER modes. Fantastic.
Beam characteristics: First, let's discuss the tint, because, as many of you know, I'm a tint geek. I was surprised at how much I like the tint of these cool white XP-G2 LEDs. They give off light with a very CLEAN white appearance. Yes, a bit on the cool side, but for the first time in a while, I didn't feel the need to filter it.
Here is a view of beam from side, shown along a white wall:
I'm not sure how Specialized measured the output of their headlight, but I did a quick bathroom bounce test comparing it to my new ZL SC62w, rated at 930 lumens on turbo, and the Flux Expert Headlight was substantially brighter on FULL POWER mode with all 3 LEDs turned on.
As to the beam pattern, one of my top priorities for a bike light is having a beam that does NOT blind oncoming traffic, meaning it needs to have a good horizontal cutoff. Second on the list is having a beam that is evenly lit from front to back (and side to side), without any hotspots. For me, it's these two primary characteristics that define a "bicycle headlight" as opposed to a flashlight that is being used on a bicycle.
The main beam stretches evenly from the bike wheel (yes, the bike wheel) out to about 80 feet, then tapers off slightly out to 120-140 feet. It has a fair amount of side spill, enough to feel comfortable going around corners.
One thing that sets the Flux Expert apart from many other lights is its Lowbeam/Highbeam switching capability. I left the light on Lowbeam for most of my urban riding, but when I did kick on the Highbeam, it easily lit up street signs 2 blocks away. Even more, when I hit the unlit trails around the lake, the extra punch and height of the Highbeam were greatly appreciated.
All-in all, a very well designed and rider friendly beam.
So, there you go. I great new headlight from Specialized, with build quality made to last, and top-of-class useful features for riding out in the real world, night OR day.
To wrap it up, here are what I see as the pros and cons:
PROs:
1. Outstanding build quality.
2. Rugged, easy to use mounting system (once it's mounted).
3. Remote control for Mode selection and Lowbeam/Highbeam selection.
4. Built in lithium-ion batteries for easy, no hassle charging.
5. Accepts 3.7-4.2 volt external battery pack.
6. Easy to see battery strength indicator on top of light.
7. Weather resistant design.
8. 4 Main Modes, 4 Submodes, and 2 extra Functions.
9. Very even beam pattern from front to back and side to side.
10. Lowbeam has excellent horizontal cutoff, won't blind oncoming traffic.
11. Easy aiming of light, even with light OFF.
12. LIGHT HORN.
13. Two year warranty.
CONs:
1. Price (but you do get what you pay for).
2. Batteries not user replaceable (can be replaced by Specialized dealer).
3. Must use the remote to access Submodes and extra functions.
4. Remote cable could be more robust.
5. Potential accidental turn ON because of protruding MODE button on light.
6. Mount could be easier to attach and detach.
Yes, it costs more than other lights out there, but after using it for several months, I can tell you that once you've ridden with it, you'll appreciate just how well your money was spent.
I feel with the release of the FLUX Expert Headlight, the folks at Specialized have produced an exciting new addition for the world of bicycle lighting.
Thanks again to Eric Lee at Specialized for providing the Flux Expert Headlight for this review, and making himself available to answer my many questions.
I'll have the reviews for the Flux Elite Headlight and Flux Expert Taillight up soon.
Happy trails!~
Derek
Last edited:
")