Cave Exploring Headlamp List - regularly updated, includes tech specs

Mooreshire

Newly Enlightened
Joined
Jul 22, 2011
Messages
156
Location
Seatte, WA
Phaethon lamps were added to the list with a separate entry for each of their two versions. The Armytek Tiara was added too, but the A1 and C1 versions were combined into one entry with the "pro" variations mentioned in the upgrades/options column. Scurion run-times were updated to reflect their having switched to newer batteries. Also maybe some other updates I've forgotten about. As always, let me know if anyone spots any errors. :)
 

Mooreshire

Newly Enlightened
Joined
Jul 22, 2011
Messages
156
Location
Seatte, WA
I've added the Manley20 to the list, updated the Black Diamond Icon and Petzl MYO, and tweaked a few other fields. I'm still cleaning up the El Speleo entries, which had comprised of outdated models with higher prices. Thanks once again to everyone who has emailed me with updates and suggestions.
 
Last edited:

eh4

Flashlight Enthusiast
Joined
Oct 18, 2011
Messages
1,999
I'm not a caver but I love climbing around underground when I get the opportunity, exploring in general.
Since Zebralights are already part of your discussion I'd like to mention that I've mocked up a simple setup to hold an H602W with an H600W directly below it, or vice versa, just gotta get a helmet.
There's redundancy and a really nice variety of beam combinations, and each light can be swiveled up or down independently.
Anyhow I wanted a nice caving light for the next time I get the opportunity, and I thought that this combo would make for a versatile quasi budget alternative, especially considering their non caving uses.
I'd love to get a Phaethon, the Dual Zebras setup is itself sort of a Phaethon surrogate.

Also: http://www.candlepowerforums.com/vb...guy-Two-thoughts-here-for-talented-machinists
 
Last edited:

Mooreshire

Newly Enlightened
Joined
Jul 22, 2011
Messages
156
Location
Seatte, WA
I've seen a fair number of cavers with Zebralights mounted together in flood+spot pairs like that. Very popular arrangement.
 

GeoBruin

Flashlight Enthusiast
Joined
Sep 20, 2010
Messages
1,170
Location
Los Angeles, CA
It's funny I independently thought of doing the same thing. 2 zebras mounted on top of each other. Now I don't know if I should work on a bracket for that setup or a way to power an h602 from multiple cells.
 

eh4

Flashlight Enthusiast
Joined
Oct 18, 2011
Messages
1,999
Do both!
I've attempted to order spare tail caps from ZL, the advice a got from customer service was to order head straps and then change the order to tail caps in the order notes... So I did that and I'll find out if I'm getting spare tail caps or unwanted straps in a few days.

Edit:
on May 15 two tail caps arrived.
 
Last edited:

eh4

Flashlight Enthusiast
Joined
Oct 18, 2011
Messages
1,999
You bet!
I suspect you'll get a functional version done before I even get a working glans interface/dummy battery insert figured out.
Another thought for dual mounting H600 and H602W with external batteries is that maybe only one of them needs the extended capacity. I find that I tend to run the H602W on higher levels and mostly use the H600W on lower levels to give some additional throw to the H602W's flood, just enough that it balances my center and peripheral view, otherwise I get the sensation of seeing better peripherally than straight ahead. Occasionally bumping H600 up on high for a minute and then back down to support role for H602.
This would also spread the benefits and the liabilities between the two lights, the single battery light may run out sooner, while the other shines on during the battery change.
On the other hand, the self contained single cell light will shine on while dealing with any problems with the extended cable/battery case.
-then you could still carry spare tail caps in case the extended case had to be resigned to mere battery storage.
 

GeoBruin

Flashlight Enthusiast
Joined
Sep 20, 2010
Messages
1,170
Location
Los Angeles, CA
eh4 you're a genius! You've inspired me and I took advantage of the long weekend to work on our little project.

The cable gland was actually easy and I'm super impressed with the part. Just drilled a whole in the tail cap, stuck it through and tightened the nut on the inside. The hard part was the dummy battery insert. Imagine two dummy 16340 cells. I drilled a hole lengthwise through the first one (closest to the tailcap) so I could run the positive battery wire completely through it. I then soldered the positive battery wire to the second spacer. I placed a thin foam insulator between the two dummy cells. I then soldered the negative battery wire to the first dummy cell so it makes contact with the gland/tailcap with gentle pressure from the spring in the head of the light. Once I put the whole thing together, I used some 3/4 shrink wrap to hold it all together as a single unit.

The waterproof connectors are also very robust. They have a nice o ring and thread together tightly.

The I tried two methods of making a battery pack: For both methods, I soldered some heavy wire between the two positive sides and then again between the negative sides. I then soldered the leads to the waterproof connector. I held it all together with some electrical tape. This is where the two methods varied. My first attempt was to plasti-dip the entire things including about an inch of the connector. I did two coats. I thought I had it a little thick but when it dried, it hardened up nice. For the second attempt, I used rescue tape. I had never used it before but wanted to try it. That stuff is ridiculous. I screwed up about half way through and tried to pull the tape off... IMPOSSIBLE. It fuses to itself so well it will rip before it comes unstuck. I made a second attempt, wrapping the whole pack plus a couple inches of the connecting wire. It turned out really well and I'm super happy with it. I've considered re-doing the plasti-dipped pack but I figure I'll use both and see how they hold up. In either case, I'm very confident in the waterproofness of both packs. I used some old unprotected laptop cells so once I settle on my ideal design, I'll do the same with some high capacity protected cells and just recycle the connectors.

So now I had something that didn't really have a compatible head strap. Time to break out the sewing machine! I started with a strap that came with a Malkoff MDC. I added some additional velcro in strategic locations including in front above the stock velcro, in the back, and some additional on the sides. I then made up some elastic holders for the battery pack, the cable, the auxiliary front light, and a spare cell holder for the other side.

Okay, enough talk... time for pictures!

5Sn52cb.jpg


YR4KxdT.jpg


vj0JpRX.jpg


tavfwtn.jpg


TvZDjJB.jpg


6R28qzE.jpg
 
Last edited:

hazza

Newly Enlightened
Joined
Aug 19, 2014
Messages
196
Wow, that is some heroic modding! A job well done!

What make/model are the waterproof connectors?
 

GeoBruin

Flashlight Enthusiast
Joined
Sep 20, 2010
Messages
1,170
Location
Los Angeles, CA
You can look on Amazon for "LEDJump® Male Female Plug 2 Pin LED Waterproof Connector Cable Black (5-pack)" for the connectors and "Stainless Steel PG7 3.0-6.5mm Waterproof Connector Cable Gland 3 Pcs" for the glands. Sorry for not linking... I always end up getting my hand slapped for linking directly to products.
 

eh4

Flashlight Enthusiast
Joined
Oct 18, 2011
Messages
1,999
Hey that's pretty slick!
Especially for the first one.
Looks comfortable and the balance looks good.

So your battery packs will charge together in parallel through the cable, those are going to be lighter end more compact than boxes, maybe more prone to damage.
The nicest ready made battery box I've been able to find so far is a surplus/discontinued Rude Nora box at http://www.customduo.co"DOT"uk/Pages/RudeBox.aspx
-replace "DOT"
I've blown my budget for now on a nice helmet, and 60$ is pretty rich for a little case but it's the nicest one I've seen by far, will hold three 18650, check it out.


Your dummy battery looks good, I'm going to try and leap frog it using one piece, maybe pvc, maybe with an epoxy plug poured in the end to hold the + terminal securely. I'd like it to be anchored to the tail cap maybe threaded on, probably with the spring removed, it'll have to be able to come apart when the cable needs replacing.
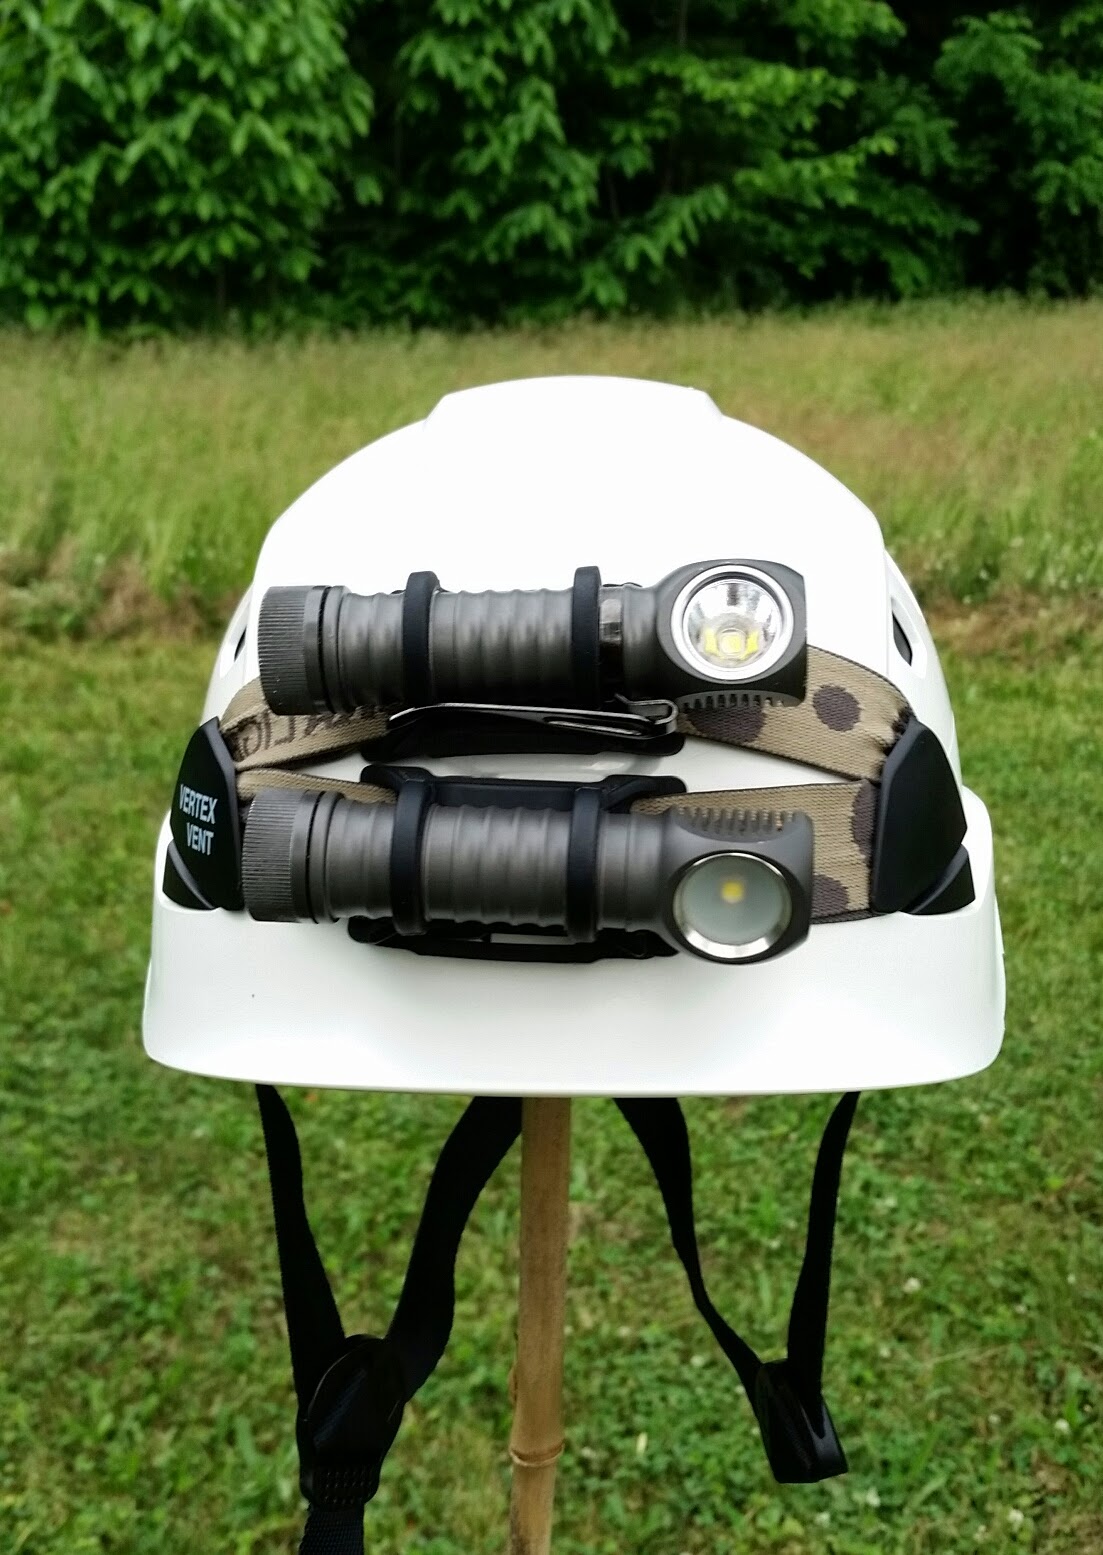
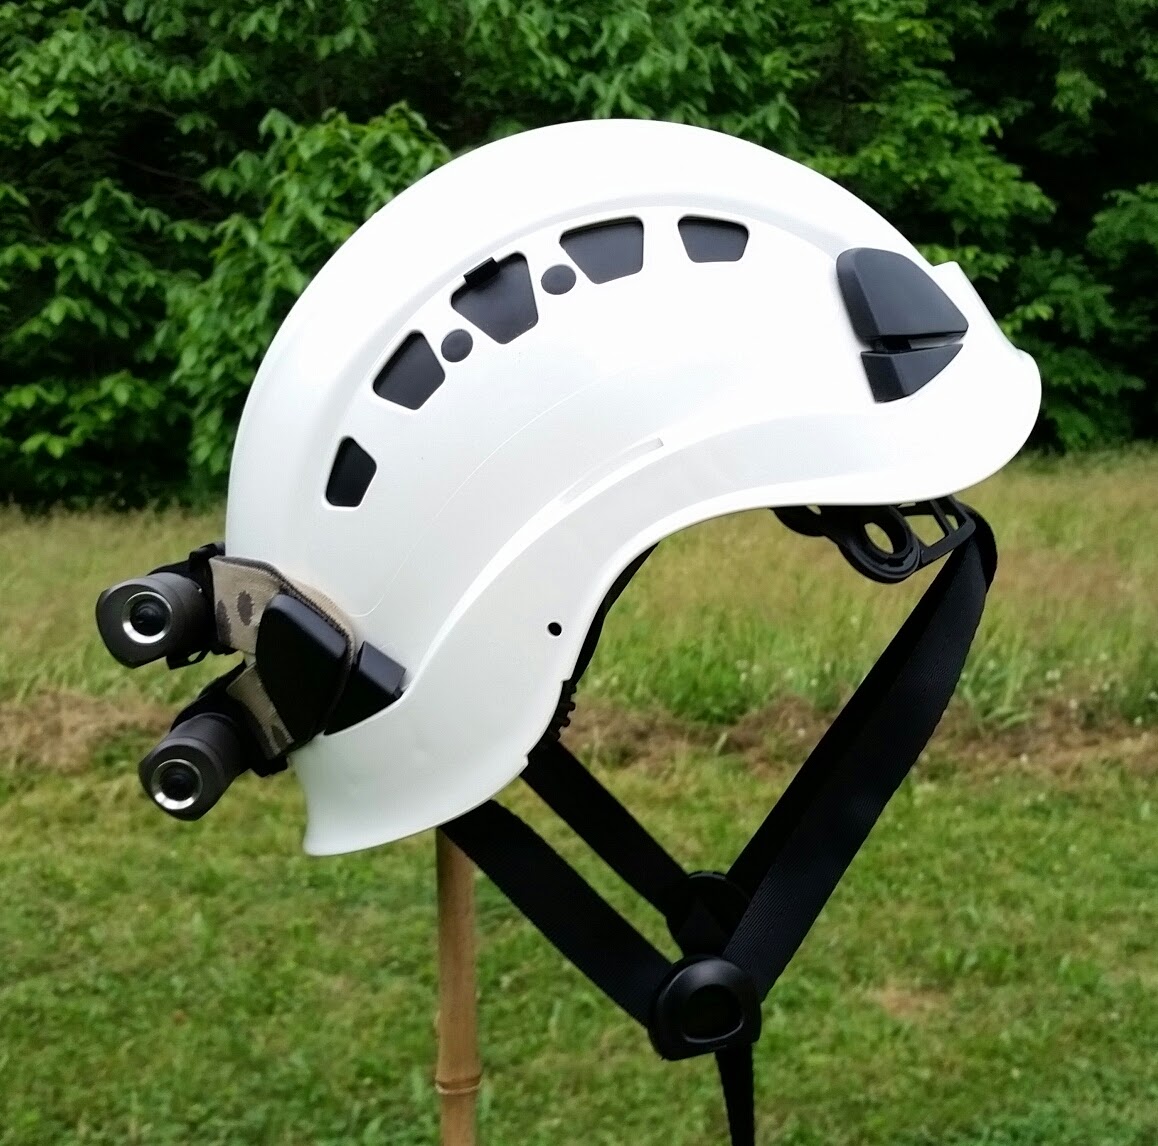
This is as far as I've gotten:
2015-05-25%25252019.11.34.jpg

I think that the ability to independently tilt the lights is going to be useful.
2015-05-25%25252019.10.01.jpg

I definitely need batteries or other ballast on the back. Only slightly annoying as is but I can tell that the front heavy loading would get more distracting over time.

"You can look on Amazon for "LEDJump® Male Female Plug 2 Pin LED Waterproof Connector Cable Black (5-pack)" for the connectors and "Stainless Steel PG7 3.0-6.5mm Waterproof Connector Cable Gland 3 Pcs" "

-Great, that was my next question. ;-)
 
Last edited:

GeoBruin

Flashlight Enthusiast
Joined
Sep 20, 2010
Messages
1,170
Location
Los Angeles, CA
Thanks all!
eh4, I would happily send you a cable gland and connectors in exchange for one of those extra tailcaps...:whistle:

I fully committed to this project without having an extra in hand. If you need both, I'll just try your method of ordering from ZL.

Yes, I thought about a battery box as well and I may do something like that for a helmet mount but for the head strap, I wanted to stay as light and minimal as possible. Also, I'm using up a cache of old laptop cells so I'm not worried about recovering the cells. That site says 60 pounds not 60 dollars. Did you see it discounted somewhere? That would be spendy. I found a Fenix box I liked but would have to hack it to put the cells in parallel.
 
Last edited:

eh4

Flashlight Enthusiast
Joined
Oct 18, 2011
Messages
1,999
Huh, that's a thought.
I was just ordering those right now, got distracted and checked back here on the way back to the amazon tab.
PM me your mailing address and I'll shoot a tail cap to you tomorrow.

Edit, ouch, yes I just read the Nora box as $, it's even worse than I thought.
Yeah if you're not banging the batteries on stuff I think your light weight solution is best too.
I'll probably be doing the same here at first, don't see a good box solution materializing very quickly.

PM sent.
 
Last edited:

hazza

Newly Enlightened
Joined
Aug 19, 2014
Messages
196
Edit, ouch, yes I just read the Nora box as $, it's even worse than I thought.
Yeah if you're not banging the batteries on stuff I think your light weight solution is best too.
I'll probably be doing the same here at first, don't see a good box solution materializing very quickly.

I was thinking that an affordable 2x 18650 waterproof case must exist...but I seem to be wrong. GeoBruin - I think I'd thought of the same Fenix case as you, but it goes against the grain to hack apart something nice like that! :p I spotted a couple of 4x 18650 "waterproof" cases on eBay which have the cells in a 2x2 configuration. This isn't really the right shape and 4 cells might be too much weight. They also look like they may be wired in series, unfortunately.
 

GeoBruin

Flashlight Enthusiast
Joined
Sep 20, 2010
Messages
1,170
Location
Los Angeles, CA
I've seen some of the same 4 cell holders. They're all laid out as 2S2P. That would be great for anything except a ZL which can only handle a single Li Ion worth of voltage.

I'm not too sure how tricky it would be to modify the Fenix box. The hardest part would be working down inside the box. It's cheap enough it might be worth giving it a shot.
 

eh4

Flashlight Enthusiast
Joined
Oct 18, 2011
Messages
1,999
The square packs that hold four is no good, for my purposes I think 3 packed flat is the way to go if in a box.
One nice thing about the sealed 2 pack that GeoBruin made is that you could carry X number of spare sealed packs and there's only the connector swap to worry about for water, etc. You could probably switch packs in the rain real quick by loosening and fastening the connector under your hat brim or hood.
I'm thinking now to make sealed, dipped packs like GeoBruin did, and find or form a Non water proof aluminum case to hold them, just to provide some armoring. Drill holes in the bottom for drainage.
 
Last edited:

uk_caver

Flashlight Enthusiast
Joined
Feb 9, 2007
Messages
1,408
Location
Central UK
That's neat.
I guess 'rescue tape' is self-amalgamating rubber?

Do you find it tries to amalgamate to anything else once a pack is wrapped, or does the outside harden fairly quickly?

I've made many NiMH packs out of 3x 18650-ish cells, and for waterproofing them I use self-amalgamating tape, but then cover it in clear heatshrink to stop the pack sticking to things (especially other packs) and to stop the rubber getting damaged if people throw a spare pack in a bag or pocket full of other things.

Also, since most of my caving friends use these packs, they need to be easily distinguished, and the clear heatshrink allows for easy permanent marking. I cut squares of reflective food packaging and write initials+pack number on the silver side, then slip them under the heatshrink before heating.
 
Top