Dynamo to 5V USB charger

rjtedge

Newly Enlightened
Joined
Jul 9, 2013
Messages
6
Hi,

I am looking to make a 5V USB battery charger for my SP Dynamo Hub. I will use the charged battery to charge my phone and other devices.
I am planning to make this as basic as possible and just wanted to check if there are any concerns with my proposed design/circuit.

From the dynamo (which says it is 6V 2.5W output) I will connect:

2200uf 25V Capacitor -> Bridge Rectifier(1.5A 100V) -> Output Converter DC 7V-24V To 5V 3A Step-Down Buck with USB output.

Should there be any issues with such a set up?

Thanks
 

Steve K

Flashlight Enthusiast
Joined
Jun 10, 2002
Messages
2,786
Location
Peoria, IL
The first thing I notice is that the filter cap is placed at the dynamo output.. it should be moved to the output of the bridge rectifier.

The only other thing that jumps out at me is the issue of the dynamo voltage when there is minimal load.
The dynamo voltage is described correctly, and if there is always a 2.5 watt load, then the voltage should be fine. I anticipate that there could be a problem when the battery is approaching full charge and there is very little load on the dynamo. In that scenario, dynamo voltages can easily exceed the voltage rating of the capacitor and buck converter.

This could be handled by selecting parts rated for higher voltages. Depending on how fast you will go, the voltage from an unloaded dynamo can be surprisingly high! I've measured 100V out of my SON dynamo at 50mph (going down a 14% grade). It's not easy to find a buck converter rated for high input voltages that is also happy running at 6 or 7V, so this solution might be hard to implement.

An alternative is to use a shunt regulator to limit the dynamo voltage. Ideally, you would replace the buck regulator with a precise shunt regulator, but I suspect that you'll have trouble finding one. The next best alternative would be to place a high power bidirectional zener diode in parallel with the bridge rectifier input, or alternately, a unidirectional zener diode in parallel with the rectifier output. This would clamp the voltage to a safe level.

The downside of this approach is that it will be a load on the dynamo. This means that you'll be generating 4 watts or more just to turn it into heat. Plus, you'll need to provide a way for the zener diode to get rid of the heat. If it overheats, it'll short out (most likely).

I'd recommend something like the 1N5343 5 watt zener diode....
https://www.digikey.com/products/en...t=0&page=1&quantity=0&ptm=0&fid=0&pageSize=25

The zener's cathode (the end with the stripe) should be connected to the positive output terminal of the bridge rectifier, and of course, the anode is connected to the negative terminal.

You'll have to experiment a bit to see what it takes to keep the zener reasonably cool. To some degree, it might be adequate to simply solder the zener to a large area of copper plated circuit board. It might also be adequate to epoxy an aluminum heatsink to it. It'll take some tests to see what is easiest or more appropriate for your situation.

That's all I've got for now. Good luck!

edit/update: a similar discussion is evolving in the Supernova thread. See this post: http://www.candlepowerforums.com/vb...mo-headlight&p=5172438&viewfull=1#post5172438
 
Last edited:

rjtedge

Newly Enlightened
Joined
Jul 9, 2013
Messages
6
Steve that is great info! Thanks heaps. I realized that i got the bridge rectifier and capacitor thinking over it last night. Over voltage damage is my main concern - I think the Zener diode is likely the best approach i have seen - heat will only be a problem when the voltage increased to much correct or is that it will always be loading the dynamo so the voltage does not increase?

Does anyone know what the Sinewave Cycles Revolution unit uses to limit the voltage?
 

Steve K

Flashlight Enthusiast
Joined
Jun 10, 2002
Messages
2,786
Location
Peoria, IL
Steve that is great info! Thanks heaps. I realized that i got the bridge rectifier and capacitor thinking over it last night. Over voltage damage is my main concern - I think the Zener diode is likely the best approach i have seen - heat will only be a problem when the voltage increased to much correct or is that it will always be loading the dynamo so the voltage does not increase?

Dynamos have a lot of source impedance (i.e. internal resistance and inductance), which is what limits the current to 500mA. If the load is drawing a lot of current, then the voltage drop across the internal impedance keeps the voltage low. As the current drawn by the load decreases, then there is less voltage drop across the internal impedance, resulting in higher voltage at the load itself.

In the case of charging a battery, the voltage from the dynamo will be relatively low when the battery is drawing a lot of current. However, when the battery reaches full charge and draws very little current, then the voltage from the dynamo will be fairly high. Once that voltage reaches the level where the zener diode starts to conduct, the zener draw enough current to keep the dynamo voltage at the zener's rated voltage (with some tolerance).


Does anyone know what the Sinewave Cycles Revolution unit uses to limit the voltage?

their design doesn't appear to be intended to get rid of a few watts of heat, so I'm guessing that it is a buck converter (a.k.a. a switching regulator that acts as a series regulator). I'm curious as to whether they've used a standard buck converter, but used high voltage mosfets, or whether they've used a little microcontroller as the control chip, along with the usual buck converter components.

By the way, I took a quick look at the Texas Instruments web site, looking for a buck converter than can handle 100V inputs. It turns out that they are selling one! The LM5161 is rated for input voltages of 100V, and can operate down to 4.5V. That could be very helpful! The package of this device is pretty small, so it's hard for a hobbyist to use. Seems like it would require a proper printed circuit board instead of some of the hacked up boards that I've made. :)
Of course, for switching regulators, it's best to have a real ground plane and have the locations of the parts optimized, so a good 2 or 4 layer PCB is recommended.

One of the interesting things about using buck converters is that if the load wants more power than the source (a.k.a. the dynamo) can deliver, then the converter may pull so much current from the source that the voltage drops too low for the converter to operate. In some designs, there is extra circuitry designed to limit how much power is delivered to the load, with the goal of optimizing the amount of power drawn from the source. This is where a microcontroller, or a really clever analog circuit, can be quite helpful!

This problem of the load drawing too much power from the source is a bit of a concern with the shunt regulator too. The worst case is that the load will still draw the 0.4A or 0.5A that the dynamo can source, which isn't too bad.

The best case arrangement is when the controller of a buck converter monitors when the load wants more power than the source can provide, and then adjusts the operation of the buck converter to draw the maximum amount of power from the source. This is not uncommon for converters designed to work with solar panels. I'm not sure if the Sinewave device does it or not. With a microcontroller, it should be possible... but then I'd also expect them to be advertising this capability. Not much point in adding the feature if you don't tell potential customers! :)
 

tspoon

Newly Enlightened
Joined
Apr 4, 2004
Messages
33
It's quite possible that even a 5W zener may not be enough, even though it should be. In 2016 I set up my own AC/DC conversion system, similar to your proposed setup, it was for a bike holiday. I had 2x5W diodes, mounted in series/opposite on the AC side. Then I started off on the holiday. On the first day I did some charging successfully, but after the battery was full the system spent time heating the zener diodes (I think they were 12V rated, or possibly 9V). By the end of the day one had failed, giving a dead short to one half of the AC waveform, I noticed because my light was quite dim. The plastic enclosure for the circuit also went 'melty'. For the rest of the holiday I had to be very careful and not run the system with no load, in practice this meant keeping the light on.
Since then I tried a 10W zener, but you need a heatsink or metal case, so eventually I used the Shimano SM-DH10 voltage limiter that comes with their hubs. It is meant to be used for protection of a 0.6W incandescent tail lamp if the front 2.4W lamp blows. It isn't merely a zener design, there appear to be other components. When tested with a DC source the unit slowly starts to conduct/limit at around 8.5V, approximating a value just above the peak of a 6VAC waveform. I use it on the DC side, so only using half of it's circuitry. With the 8.5V limiting it begins to work just above my 2 cell lithium battery charging setup, which is charged when the voltage reaches 8.4V. Once the battery protection disconnects the battery from charge, the limiter begins to work.
 

Steve K

Flashlight Enthusiast
Joined
Jun 10, 2002
Messages
2,786
Location
Peoria, IL
The 5W zener is probably fine if you are clamping the voltage to 9V. The most it will have to handle will be roughly 9 watts (9V times the 0.5A that is generally the max that a dynamo will produce).

The zener does expect a certain amount of heatsinking, and this is defined in the datasheet. As noted, putting it inside of a thermally insulating plastic housing won't do the job. If exposed to the airflow, it will probably be fine. Of course, that means it will be exposed to the elements, such as rain, which is not too good for the zener diode.

One option to using a zener as a shunt regulator is to just use two or three white LEDs wired in series. These will clamp the voltage to 6 or 9 volts rather well (make sure you use LEDs rated for at least 0.5A). Just make sure you provide proper heatsinking, and you may want to add an optic or reflector to put the photons where you want them.
 

rjtedge

Newly Enlightened
Joined
Jul 9, 2013
Messages
6
I'm a bit confused about what the circulate would look like to incorporate the Zener, could you explain where it would go? In terms of heat sinking, could i make the case from aluminum and use some thermal glue to make a connection between the zener and the aluminum - would that be enough?
 

Steve K

Flashlight Enthusiast
Joined
Jun 10, 2002
Messages
2,786
Location
Peoria, IL
On the topic of "how do I heatsink my zener diode?", the datasheet does say that the "primary path of (thermal) conduction is through the cathode lead".
This is on page 4 of the datasheet for the 1N53xx 5 watt zener diode. Figure 1 shows the thermal resistance as the length of the zener's leads changes. It assumes that the leads are soldered to something that is a heatsink or closely coupled to a heatsink.
This info is from the OnSemi version of the datasheet. Their website is onsemi.com, and a search for 1N5333 will usually bring up the datasheet, but seems to be broken right now.
Digikey has this link to the datasheet: http://www.onsemi.com/pub/Collateral/1N5333B-D.PDF

Anyway... copper-clad circuit board is how I usually build boards. I would recommend having the diode's cathode (the end with the stripe) soldered to a large area of copper, and then using a thin insulating layer to couple it to a heatsink. The heatsink could be the interior of an aluminum housing.

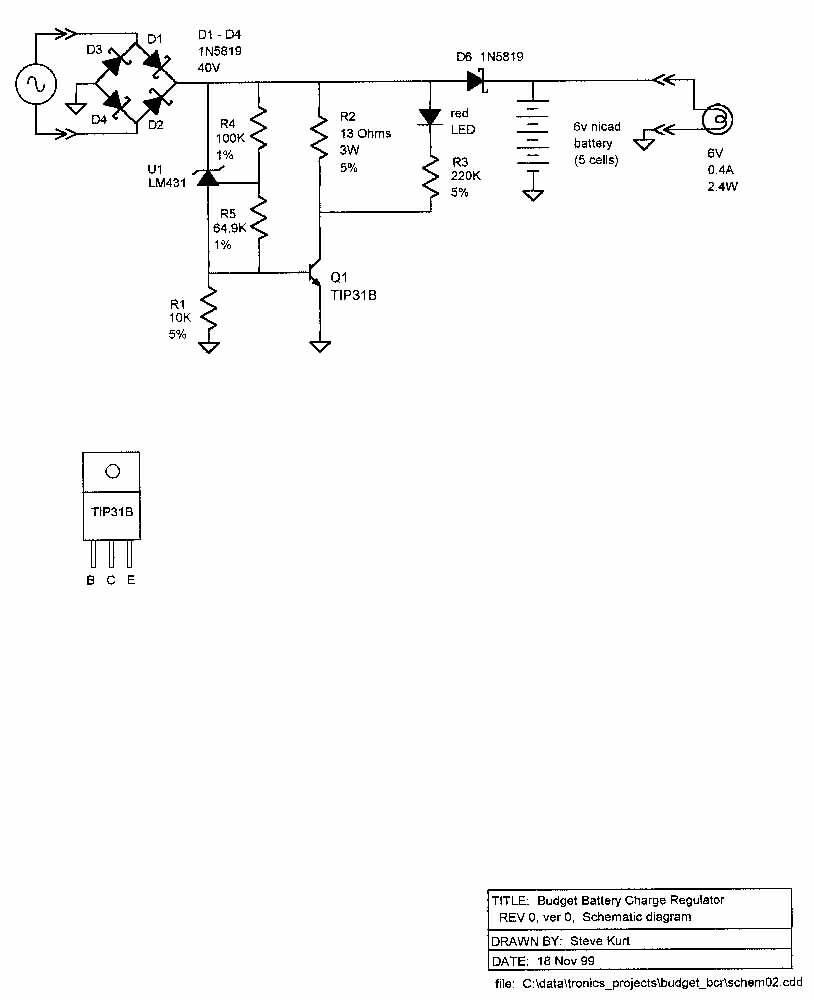
Many years ago, I threw together a quick shunt regulator to allow a friend to charge nicads while touring. It's more precise because it set the battery charging voltage. The arrangement is basically that a voltage reference is used a zener diode, and then that voltage is fed into a NPN transistor's base. The collector is connected to the voltage to be regulated, and the emitter is grounded. The transistor is just acting as a current amplifier for the zener.

My circuit does add a power resistor in series with the transistor's collector, just so the resistor can help get rid of some of the heat.

The voltage reference could be replaced with a low-power zener, if it is just being used to limit the input voltage to series regulator like the MIC2940.

Here's my schematic...

5242793132_37bc5ea054_b_d.jpg


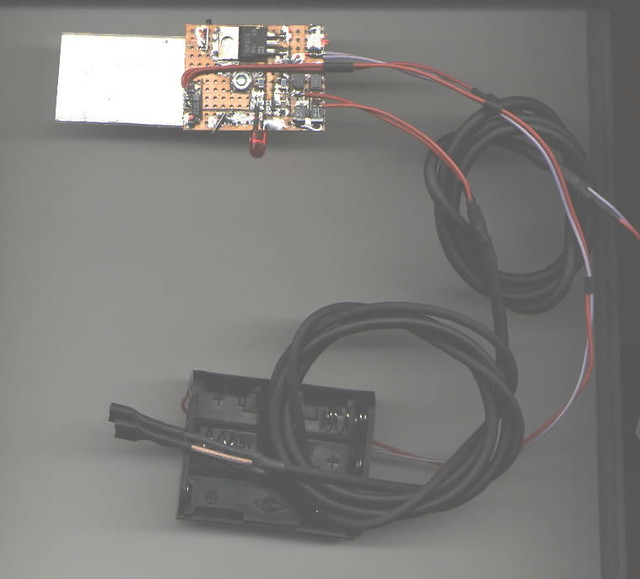
and a few photos of the board...

5242199567_7b414baaa7_z_d.jpg


5242787820_c651bfbc9d_z_d.jpg


In these photos, the transistor has it's tab soldered to the copper-clad board, and a piece of aluminum is bolted to the back of the board. I think I had the power resistor epoxied to the other side of the aluminum. The whole thing is coated with plasti-dip, which is a small step up from just wrapping it in tape, but it does provide some protection from moisture.
The aluminum needs to be exposed to airflow.

So.. in summary, connecting the leads of the zener to a large thermally conductive body is the best way to get heat out of it. Attaching a heatsink to the body of the zener is not as good since the zener's body is not thermally conductive. It's still better than no heatsinking at all, though.

In my circuit, I used a transistor and power resistor to dissipate the heat, and the transistor had a package designed to get the heat out.
There are better ways to do it, but for a quick cheap design, this isn't so bad. :)
Always check on how hot the zener gets once you do build it up and test it. If it is too hot to touch, then it's probably above 60C, and could use a bit more heatsinking. If it burns you, then it's definitely in need of more heatsinking!
 

macatarere

Newly Enlightened
Joined
Aug 14, 2018
Messages
2
Hello Steve K

I like the simplicity of your circuit and would like to adapt it to 2S li-ion. Adjusting the voltage reference to ~8.1v might do it? Perhaps add a secondary protection ic.

Rather than dump excess power through a heat sink would it be possible to disconnect the ac input when battery voltage reaches 8.1v instead?

Thanks for your encouraging posts and snippets of your professional career, all very interesting.

Best wishes
Peter
 

Steve K

Flashlight Enthusiast
Joined
Jun 10, 2002
Messages
2,786
Location
Peoria, IL
hi Peter,

Disconnecting the AC input seems reasonable. Electrically, this can be done with a P channel mosfet or PNP transistor.. or even a relay, although that's a bit inefficient (and I'm not sure that relays like being bounced around on a bike).

I've done a somewhat similar technique for charging nicads... I applied the rectified dynamo current when the battery voltage was below a certain level and disconnected the dynamo when it got above a certain level. You could adopt chunks of the circuit for your purposes.....

24171993235_f46f3c68f1_b_d.jpg


The circuit is like a basic, simple switching regulator, but without an inductor to store energy. There is a sawtooth generator and a feedback integrator. The output of the integrator is compared to the sawtooth wave, and the switch transistor, Q1, turns on and off, depending on whether the sawtooth exceeds the integrator or not.
edit: the battery being charged is connected to the terminal labeled "E4".

Whether or not this is suitable for lithium batteries is something I haven't thought about. There is always the concern about the max charging current, voltage, and temperature for lithium batteries.
 
Top