creating custom 6P tailcap boots

DrafterDan

Flashlight Enthusiast
Joined
Jul 28, 2013
Messages
1,318
Location
Phoenix, AZ
I've looked into this before, but decided to try to make my own custom tailcap boots. Basically create a mold so I can make custom colors, or glowy boots or whatever I feel like. The end goal would be to make a boot that has my own design, but that would take more time for me to get comfortable with the 3D program Blender.

So for my first trials, I'm copying existing 6P style boots, using a 2-part resin to create the mold. Unfortunately, the resin I purchased has something like a 24 hour cure. I did the first half of the mold this morning, and will see how it turned out when I get back in town in a couple days.

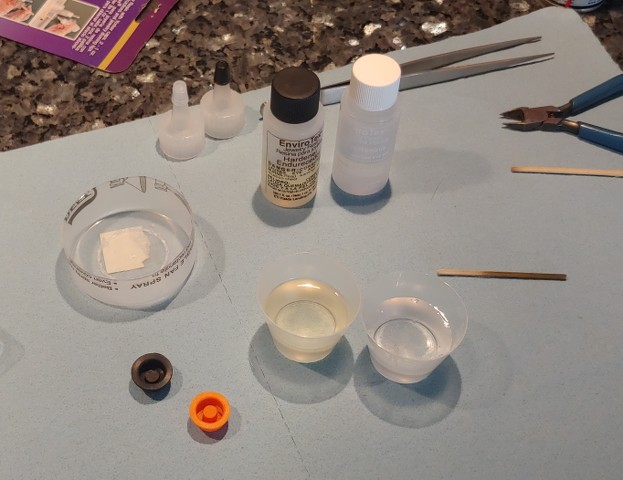
Here I'm setting up for the pour
Gu4r4y.jpg


Second image is of the two boots placed where I want them. I've used a bamboo skewer to act as the sprue points. I'll refine the pathways with a dremel tool when its fully cured.
I coated the boots with WD-40 as a release agent, because that's what I had on hand. That's why the exposed part of the boots look wet, that's not epoxy.
TRqoPf.jpg


_Daniel
 
Wow, very cool!! I'll certainly be following this thread as I've been looking for ways to make boots for a long time. Quick question for you, once you have a mold, is it basically re-usable indefinitely? Like If I make a mold once can I cast a large number of boots from it?

I have been trying to find someone to make the original 1979 switch boots for Maglites which are much larger than other years and are long discontinued. I haven't had any luck finding someone so I may make them myself.
 
Hopefully my experiments will help you as well! That is the intent, to make a durable mold that I can reuse. The resin I purchased locally seems to be the type that sets up rock hard.
My next mini-hurdle is to figure out what barrier I can put between the two layers so that they can be removed. I'm thinking some type of thin plastic sheet so as to not increase the overall thickness of the flange on the boot. I'll have to create some registration pins as well, something that won't adhere to the resin.
More to come!
 
Okay, some issues. The resin set up mostly okay, but there are some soft spots, and it's kinda sticky.

R1c1S8.jpg


The fully cured resin is not rock hard, but more like a hard rubber? It seems to retain imprints, like my fingernail where I poked it. I'm not sure this is the best material to use, but I'll proceed, because even if this particular mold fails, it will be a learning experience.

I'll try to pour the next layer to finish the mold tonight
 
It did, the boots pulled free from the resin without any difficulties. From what I can tell, it allowed a clean transfer of the pattern to the resin, looks pretty good.

I do wonder if the WD40 is what caused some uncured resin by reacting somehow? It seems to be softest and/or stickiest right at the location of the boots. There is a company fairly close to me that specializes in hobby mold making, I intend to speak with them on this project in the coming days.
What I was trying to avoid is the very common silicone mold kits, because the end product will be silicone. That is, unless the company suggests a type of rubber that will not adhere to a silicone mold, and be durable. In case some readers of this post do not know, cured silicone won't adhere to materials except other silicone. So you can see I'd have a solid block of silicone if I tried that method.

I fully realize I'm kinda blundering my way through this, but heck - it's only time and money, and I'll have a pretty solid idea of what not to do!
~D
 
The second layer pour looks exactly as exciting as you'd imagine. I'll have to let it set up for at least 12 hours before I can take it apart. The next step, assuming it ends up being a usable mold, is to decide what type of silicone to use. I've got a few types on hand, and some glow powder. It will be a fun experiment!
 
The second layer pour looks exactly as exciting as you'd imagine. I'll have to let it set up for at least 12 hours before I can take it apart. The next step, assuming it ends up being a usable mold, is to decide what type of silicone to use. I've got a few types on hand, and some glow powder. It will be a fun experiment!

This is cool! I have always wanted to do this but time is at a premium most days.

Can't wait to see the outcome.
 
Well, it's confirmed. WD-40 has a reaction to this particular type of epoxy resin. I didn't coat the inside of the boots for the second pour, and those areas are solid and great. Anywhere else I lubed up, it's all sticky and gross.

On to the next method! I'll visit that molding shop in Tempe, about 20 miles from me, so not too bad.

After the second pour, it looks like poor mans' modern art
nM9M1V.jpg


The end result, after a day-and-a-half wait. UGH
You can see the nice, clean impression from the inside of the boots, no wd-40 used there. Everywhere else it's like molassas
LDm8fU.jpg
 
I fully agree Nitroz, that would have probably saved this first experiment. That said, I don't think the hard resin was the best choice either. I must say it's pretty fun trying these experiments, but the next go-around I'll have some better knowledge going in for a successful result.

Once I get the new molding materials in, I'll just make a new thread. Maybe we can all forget about this one :)
No, it is good we post our screw ups so others can benefit.

I've been wanting to try this forever.
 
Top