You are using an out of date browser. It may not display this or other websites correctly.
You should upgrade or use an alternative browser.
You should upgrade or use an alternative browser.
Triple XML / FM 3 inch head
- Thread starter Chodes
- Start date

really nice and clean work you are doing here!
Thankyou. Speaking of clean work - your driver looks so much better than cheaper drivers I'm used to seeing
")
After an almost perfect problem free build, things went bad for a bit.
Put a small scratch in the top of the heatsink, then overheated one of the pads on the stars re arranging wires. Was trying to hide wires, but impractical I think.
Pulled it all apart, added a 4C LED, then heard the letterbox, new LED order arrived.
Did not manage to get the top copper plate back to shiny mirror finish, but decided a brushed look would be cool, cleaned up pretty good, stopped at 800 grit wet n dry, did not bother with 1200.
Added one of the T6 3C LEDs from the new order, so now 3 x T6 3C LEDs. EDIT -wrong! config is 2 x T6 3C, 1 x T6 4C
Since build almost complete and looking good, pulled reflector from my V1 Triple FM3
and assembled. Used lots of lube around lens so I could tighten bezel without spinning glass on reflectors and scratching lens.
Used some Arctic Silver around the heatsink and assembled head.
Grabbed a 4D tube and old tail with low resistance modded spring and stainless external ring for strap / lanyard.
Tried something different with mag switch rear spring, soldered 22 AWG wire to connector , through spring. Then metal epoxied around the spring. The spring now has no use, was just there to locate wire while epoxy set.
I had been connecting to power supply at various stages so new it was a worker.
Fired up with 4 fresh Smasung ICR2000 18650s and measured 3.8 Amps at tail.
Pleased to see a large amount of light coming out. Hotspot is a bit tighter (now very tight) indicating my V1 had 1 reflector not quite level (confirmed with visual inspection)
Took out for a photo, went to grab camera and heard a bang. Light rolled off sun bench onto the ground.
2nd stuff up (LED overheat, # 1)
Pleased to see only a tiny speck of ano missing from 3 inch head, tube untouched, extra scratch in tail, it was already scratched.
Over the drop instantly - it's a user now.
V1 will be rebuilt into Elephant for shelf queen.
1st time I've ever had a light roll of this bench:

See small white speck - only damage I could see.


Bezel has around 1 mm extra to tighten, will wait until I get a pot and install for dimming, tightening the bezel down without spinning lens on reflectors and or ripping domes of the LEDs is the only part of this build I get a little nervous about.
It should be dark in about 30 minutes...
I think for this light, car headlight may be good comparison
Just realized checking above, I have 2 x T6 4C, 1 x T6 3C. That was my original plan, found my way back there by mistake...
I did want just a tad cooler than 4C.
Put a small scratch in the top of the heatsink, then overheated one of the pads on the stars re arranging wires. Was trying to hide wires, but impractical I think.
Pulled it all apart, added a 4C LED, then heard the letterbox, new LED order arrived.
Did not manage to get the top copper plate back to shiny mirror finish, but decided a brushed look would be cool, cleaned up pretty good, stopped at 800 grit wet n dry, did not bother with 1200.
Added one of the T6 3C LEDs from the new order, so now 3 x T6 3C LEDs. EDIT -wrong! config is 2 x T6 3C, 1 x T6 4C
Since build almost complete and looking good, pulled reflector from my V1 Triple FM3
and assembled. Used lots of lube around lens so I could tighten bezel without spinning glass on reflectors and scratching lens.
Used some Arctic Silver around the heatsink and assembled head.
Grabbed a 4D tube and old tail with low resistance modded spring and stainless external ring for strap / lanyard.
Tried something different with mag switch rear spring, soldered 22 AWG wire to connector , through spring. Then metal epoxied around the spring. The spring now has no use, was just there to locate wire while epoxy set.
I had been connecting to power supply at various stages so new it was a worker.
Fired up with 4 fresh Smasung ICR2000 18650s and measured 3.8 Amps at tail.
Pleased to see a large amount of light coming out. Hotspot is a bit tighter (now very tight) indicating my V1 had 1 reflector not quite level (confirmed with visual inspection)
Took out for a photo, went to grab camera and heard a bang. Light rolled off sun bench onto the ground.
2nd stuff up (LED overheat, # 1)
Pleased to see only a tiny speck of ano missing from 3 inch head, tube untouched, extra scratch in tail, it was already scratched.
Over the drop instantly - it's a user now.
V1 will be rebuilt into Elephant for shelf queen.
1st time I've ever had a light roll of this bench:
See small white speck - only damage I could see.
Bezel has around 1 mm extra to tighten, will wait until I get a pot and install for dimming, tightening the bezel down without spinning lens on reflectors and or ripping domes of the LEDs is the only part of this build I get a little nervous about.
It should be dark in about 30 minutes...
I think for this light, car headlight may be good comparison
Just realized checking above, I have 2 x T6 4C, 1 x T6 3C. That was my original plan, found my way back there by mistake...
I did want just a tad cooler than 4C.
Last edited:
Very nice. Excellent metalwork! :twothumbs :goodjob:
Have you run it long enough continuously for it to get hot?
Just wondering. (but I don't doubt that that heatsink will take good care of it - especially with that copper)
Thanks. It's been hot!
No noticeable difference between the 2 lights, they both get real hot after 5 minutes, 10-12 minutes is the most I have run.
I thought the only way it will fail is if I did not do a good job mounting LEDs. Pretty well guaranteed with the screwed down LEDS.
I have pulled apart V1 light, improving that heatsink, copper wrapping bottom for both better contact with Mag tube and more direct thermal path from the top part of sink. I should be able to run it long term in a sauna :tinfoil:
Revising V1 Triple. Need LEDs higher so I don't need dodgy rubber spacers.
V2 still waiting on new reflectors but it's proven reliable and works great so I can take my time with V1.
Added 3rd 3mm copper plate. Only need about 2mm so also shaved a little of the whole sink so it can sit a little lower.
Also copper wrapped lower bits. Can't quite get inside mag tube now, will need to sand tube a little but now more direct thermal path to main sink.
Next step drill and tap for stars.
The messy looking copper step in lower part will be crushed by the mag tube and provide extra contact.
tobrien
Flashlight Enthusiast
looks perfect
Would you happen to have any beamshots that you might be willing to post? (of either, complete or not)
I'm strongly considering a triple XML build myself (using three spare UF C8 reflectors),
so I would like to get an idea of what I could expect output-wise.
Thanks, and :kewlpics:
I'm strongly considering a triple XML build myself (using three spare UF C8 reflectors),
so I would like to get an idea of what I could expect output-wise.
Thanks, and :kewlpics:
Would you happen to have any beamshots that you might be willing to post? (of either, complete or not)
I'm strongly considering a triple XML build myself (using three spare UF C8 reflectors),
so I would like to get an idea of what I could expect output-wise.
Thanks, and :kewlpics:
I have not done beamies yet, your timing is good, high chance I will do them in next few days.
(I can't imagine my light would compete with 3 x C8 reflectors, much deeper and significantly bigger diameter)
Hallis
Flashlight Enthusiast
Chodes this is looking EXCELLENT. I'm scraping together a few odds and ends to put together a little build of my own but it won't be anything near this impressive. That custom HS work is very impressive. I'll bet it has a really snug fit in the head for good thermal transfer to the head itself.
-Shane
-Shane
Still waiting on reflectors..no problem,taking my time.
My piece of mag tube I use for building was such a tight fit only way I could separate from the sink was with trolley jack.
Once that sorted, time to mark up for LED stars.

Holes drilled, give the top surface a clean up on my "lathe"
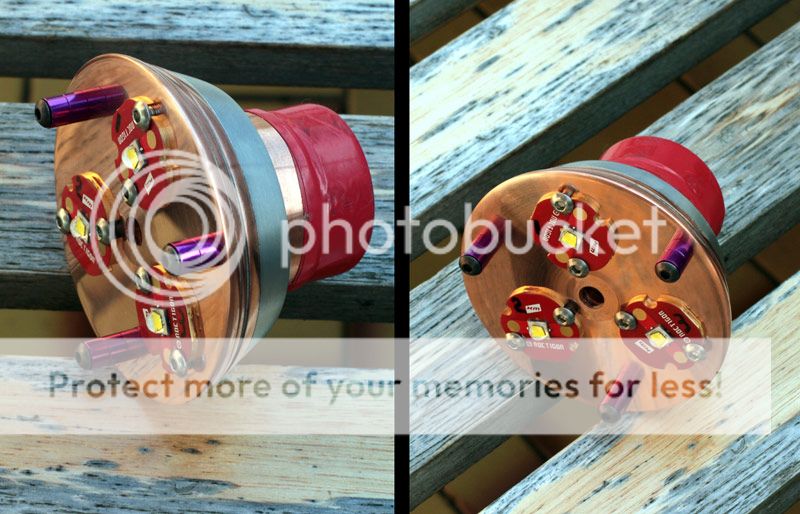
No confusion, XML2 T6 3C LEDs.

LEDS mounted with 3mm stainless screws. Extra screws / spacers will assist fitting sink into head/ light.
Will probably leave them there.
My piece of mag tube I use for building was such a tight fit only way I could separate from the sink was with trolley jack.
Once that sorted, time to mark up for LED stars.
Holes drilled, give the top surface a clean up on my "lathe"
No confusion, XML2 T6 3C LEDs.
LEDS mounted with 3mm stainless screws. Extra screws / spacers will assist fitting sink into head/ light.
Will probably leave them there.
Time for trial fit in host, bit of tapping got bottom of sink half way into Elephant. Rubber mallet should get it all the way.

Check bezel / lens fit.

Looking good,reflectors just starting to contact lens. Should be able to squash the o-ring a bit and completely tighten bezel.

Ordered H6Flex driver today, should get it Monday or Tuesday.
Time to remove LEDs and do final top surface prep.
Check bezel / lens fit.
Looking good,reflectors just starting to contact lens. Should be able to squash the o-ring a bit and completely tighten bezel.
Ordered H6Flex driver today, should get it Monday or Tuesday.
Time to remove LEDs and do final top surface prep.
Last edited:
tobrien
Flashlight Enthusiast
it still looks amazing
Many hours more:

Used the recommended thermal tape for mounting driver.

Rubber piece for spreading load while clamped for 24 hours.

Plenty room for 18AWG wires.

Just see 3mm tapped hole below left of the yellow wire. 2 of these to make fit and removal of driver heatsink easier.
Driver sink has small amount of Arctic Alumina with some Arctic 5 grease, will hold it in but should be able to break free easier than all AA.

Grease and fit.

Used the recommended thermal tape for mounting driver.
Rubber piece for spreading load while clamped for 24 hours.
Plenty room for 18AWG wires.
Just see 3mm tapped hole below left of the yellow wire. 2 of these to make fit and removal of driver heatsink easier.
Driver sink has small amount of Arctic Alumina with some Arctic 5 grease, will hold it in but should be able to break free easier than all AA.
Grease and fit.
Last edited:


Above completed late December, but hit a rather major snag - unable to get H6Flex driver to work.
(Have run on low setting for 30 minutes, but any higher level results ion shutdown with less than 1 to a few seconds)
Due to Christmas New Year, put off emailing George for help, for both our benefit!
I have spent countless hours pressing buttons and also having problem with menu.
This would be exceptionally boring for anyone without H6Flex experience or anyone not considering one,
for the few that may be interested or may be able to help:
I have 2 problems:
Shutdown on anything higher than low level problem remains.
Once in menu, I often get 2 flash responses for a click (instead of expected 1).
This can happen at any or more than 1 of clicks in a click sequence.
Further, once in menu option, not getting expected response.
Possibility switch bounce could be causing problem. I notice often once menu entered, I start clicking to get to menu option, expecting 1 flash response per click but get 2 flash responses sometimes.
That is the smaller problem by far. I could use light fine with current menu setup. The shutdown on anything higher than lowest setting makes light unusable obviously.
Videos for anyone really interested demonstrating all above.
https://vimeo.com/83274190
https://vimeo.com/83274191
What are the new reflectors like? Smooth/Orange peel, dimensions? Are you getting more throw perhaps? Good luck with the H6Flex by the way!
I really like them, 29mm diameter, about 15.6mm high.
They are faceted. (See the vertical lines.)