Surefire P3X 1000 lumens!

ForrestChump

Flashlight Enthusiast
Joined
Oct 20, 2014
Messages
3,097
Accidental post, apologies.

Making the best of it:

The circuit is clear coated to resist moisture. It has a foam pad which seems to also be another safeguard against shock.
 
Last edited:

peter yetman

Flashlight Enthusiast
Joined
Mar 23, 2014
Messages
5,100
Location
North Norfolk UK
Well at least I waited a couple of months before I took my P2X apart.
I expect you've already put it back together, it's a complete s*d to get the tubes on the board to mate with the pins on the led. I have now managed to knock both the tubes off and busted one of the pins, so don't do this too often. Mine doesn't have the foam block between the tubes, so maybe it stops the tubes getting damaged,
I can solder the tubes back, but haven't managed to get at the led board to solder the pin back. I think the black bit that the pins poke through must be loctited in, and can't shift it.
 

ForrestChump

Flashlight Enthusiast
Joined
Oct 20, 2014
Messages
3,097
Well at least I waited a couple of months before I took my P2X apart.
I expect you've already put it back together, it's a complete s*d to get the tubes on the board to mate with the pins on the led. I have now managed to knock both the tubes off and busted one of the pins, so don't do this too often. Mine doesn't have the foam block between the tubes, so maybe it stops the tubes getting damaged,
I can solder the tubes back, but haven't managed to get at the led board to solder the pin back. I think the black bit that the pins poke through must be loctited in, and can't shift it.


SO TRUE. The reason it came apart was to clean that yellow gunk off they say is thread locker. It's like clay. The rest was just so easy and smooth I just kept going. Patience and finesse ( I have neither ) , took me about 15 minutes, no problems at all. I was surprised there was no guide notch / groove to help with that, very challenging going back on. I believe the foam pad was added right when they were overwhelmed with everyone mounting them. It does seem very durable though.
 

ForrestChump

Flashlight Enthusiast
Joined
Oct 20, 2014
Messages
3,097
I'm now officially off Head Removal on X series. Going Malkoff or Elzetta next, I can play with those.


Not a fan AT ALL of removing any head. I just knew that the yellow gunk was in there. Doesn't hurt anything but now it's is clean & lubed, my OCD just won't have it.
 

ForrestChump

Flashlight Enthusiast
Joined
Oct 20, 2014
Messages
3,097
Last edited:

peter yetman

Flashlight Enthusiast
Joined
Mar 23, 2014
Messages
5,100
Location
North Norfolk UK
Dunno about floods, but thanks for the link. MD4 Hd I think, I like the idea of 105 mins at full throttle with 18650's.
The trouble with me is, I don't feel like anything is mine until I've taken it apart. Goes for cars, lights, audio and on and on. Mostly I don't wreck them, just put the P2X down to experience.
 

xdayv

Flashlight Enthusiast
Joined
Aug 15, 2014
Messages
2,037
Location
Philippines
anybody successfully used AA's on the P3X? (just like the on the new PMX). what are your thoughts? does it work well enough?
 

fivemega

Flashlight Enthusiast
Joined
Jan 28, 2003
Messages
5,540
Location
California
anybody successfully used AA's on the P3X? (just like the on the new PMX). what are your thoughts? does it work well enough?
2 NiMH in P3X is useless.
2 NiZn in P3X is little better.
3 NiMH is better than 2
3 NiZn in P3X is brighter
4 NiMH or NiZn in P3X is much brighter but too long.

If you can't remove the P3X head to bore the barrel for 18xxx then using 2x17670 with Ex/Cap will work much better, brighter and longer compare to 3 primary or even 2x17500

IMG_0791_zpsredumixp.jpg
 
Last edited:

Bullzeyebill

Flashaholic
Joined
Feb 21, 2003
Messages
12,164
Location
CA
Won't need to bore using 16650's(70's), if you have a charger that well charge to 4.3 volts.

Bill
 

etc

Flashlight Enthusiast
Joined
Dec 19, 2004
Messages
5,777
Location
Northern Virginia
Or, youtube the P3X and there's. VERY NICE heavily knurled version that SHOULD be coming out. If it does come to fruition, that baby may be worth waiting for.

Update on that? The official SF site has it apparently and there is also the smooth version. Can you get either one at this point?
 

etc

Flashlight Enthusiast
Joined
Dec 19, 2004
Messages
5,777
Location
Northern Virginia
I had to laugh when reading that as my conclusion is exactly opposite ... I have the P2X & P3X both with click switch. Unsure whether to keep the P2X or sell it as it has not been turned on or carried since the P3X arrived.

For a number of people, self included, the grip area on the P2X is uncomfortably short. The additional 35mm on the P3X body makes it feel like the old style Surefire 6P or 9P. The P2X never had that feel from day one & it never will. The shorter length is a positive if you wear the light on a duty belt but that is not in my current job description.

Subjectively, beam brightness & beam quality on the P2X are excellent. The light has run roughly an hour every day since it arrived in February 2013 - about 200+ hours of use. I was very satisfied with the P2X until it was run side by side with the P3X in field conditions - the difference is immediately obvious & it's huge. Everything about the P3X beam is an improvement over the P2X. Where the two cell was excellent the three cell is superb.

Good point. I am in the process of getting the Fury and I like the 3-cell version precisely for these reasons.
 
Last edited:

precisionworks

Flashaholic
Joined
Apr 19, 2007
Messages
6,623
Location
Benton Illinois
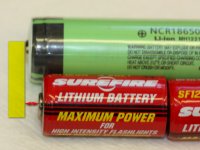
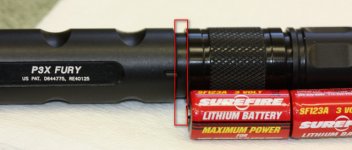
Some P3X owners want to run a pair of 18500's & that's easily done after the bore is opened up to the larger diameter. A few owners want to run 2x18650 and that requires a bit more work:
  • Add a one cell extender
  • Add a short spacer
The reason for the short spacer is that 2x18650 will not allow the tailcap to seat & the light will not work unless the TC is firmly seated.


2015-11-22_135734.jpg2015-11-22_140050.jpg

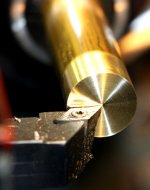
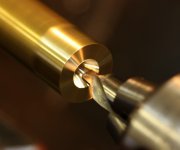
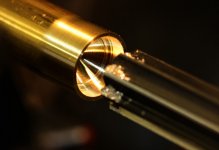
Here's the process for making the spacer:
A 1" diameter brass bar is faced off, center drilled & starter drilled:

2015-11-22_140227.jpg2015-11-22_140345.jpg2015-11-22_140439.jpg
 

precisionworks

Flashaholic
Joined
Apr 19, 2007
Messages
6,623
Location
Benton Illinois
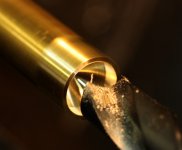
Next the starter hole is reamed to size:

2015-11-22_140530.jpg

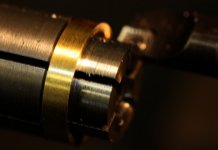
The spacer is cut off the bar & finished on an expanding arbor:

2015-11-22_140626.jpg

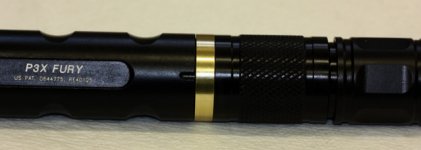
Then the ring is installed between the body & the one cell extender:

2015-11-22_140715.jpg

From start to finish the process takes half an hour.
 
Last edited:

etc

Flashlight Enthusiast
Joined
Dec 19, 2004
Messages
5,777
Location
Northern Virginia
Some P3X owners want to run a pair of 18500's & that's easily done after the bore is opened up to the larger diameter. A few owners want to run 2x18650 and that requires a bit more work:
  • Add a one cell extender
  • Add a short spacer
The reason for the short spacer is that 2x18650 will not allow the tailcap to seat & the light will not work unless the TC is firmly seated.


View attachment 1491View attachment 1492

Here's the process for making the spacer:
A 1" diameter brass bar is faced off, center drilled & starter drilled:

View attachment 1493View attachment 1494View attachment 1495

It's almost easier to get a dedicated 2x18650 body from FiveMega or a Surefire 9P with extender, bored and running a powerful Malkoff module, or something along these lines.
I do understand P60 modules don't have the throw of Fury, or G2x for that matter, due to the deeper bezel.
 
Top